
Shopping Cart
- Feroca
- Cosplay
- 0 likes
- 339 views
- 0 comments
A silicone prosthetic can be perfectly sculpted and pigmented and still look fake for one single reason: you can see the edge. And if you can't see it at first, two hours later it starts lifting at one corner. The tips for avoiding this are scattered across forums, product sheets and each make-up artist's own experience. In this guide we bring them all together: how to prepare the edge right from the moulding stage, which adhesive to choose, how to blend it with acetone, how to paint it so it doesn't flake and how to remove it without tearing it.
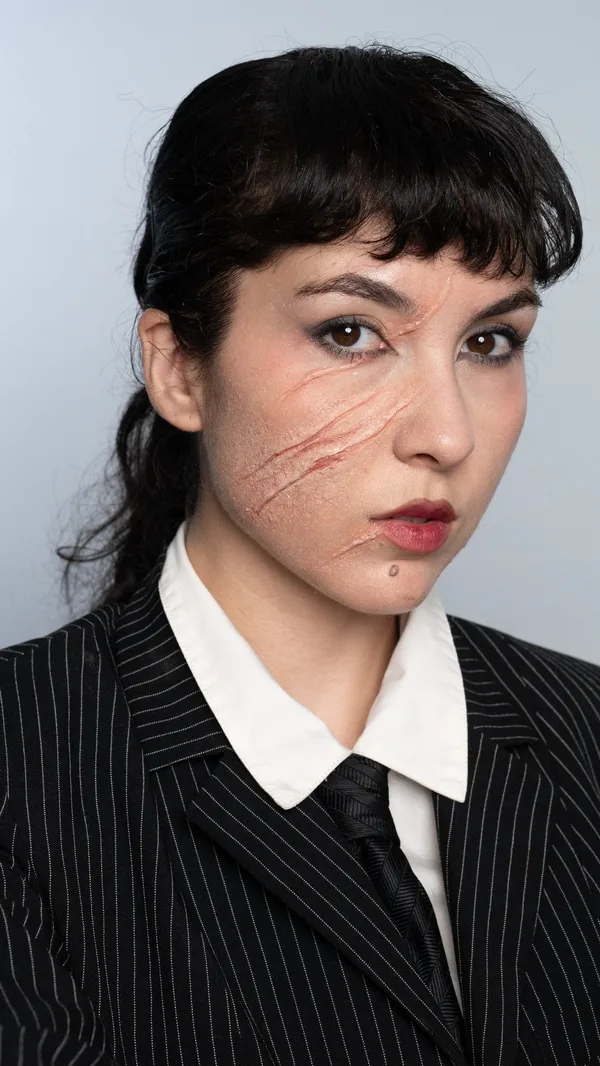
Why the edge shows (and lifts)
Almost every edge that is visible or comes unstuck fails for one of these reasons:
- Thickness: the edge is too thick and forms a step on the skin that no paint can hide.
- Shine: the adhesive or sealer leaves a sheen different from the skin's, and the light picks out the line.
- Colour: the prosthetic and the skin are different tones, or the paint has not bonded to the silicone.
- Adhesion: the skin was oily, the adhesive was still wet when applied, too much was used or the area moves a lot.
Each section of this guide tackles one of these causes.
The edge starts at the moulding stage
If you make your own prosthetics, half of the edge work is done before the piece ever reaches the skin:
- Thin edges in the sculpt. The edge of the piece has to fade practically to zero in the sculpture. An edge that comes out of the mould thick cannot be fixed during application.
- A soft, free-flowing silicone. EasyGel FX00 (Shore 00-30) flows well enough to reproduce ultra-thin edges that blend into real skin; no deadener is used with it, because it is already very soft. If you work with EasyGel FX10, you can soften it with Gloomer Deadener so the piece moves like skin. You'll find the differences between them in our guide to EasyGel FX silicones.
- Demould carefully. Ultra-thin edges are the most fragile part of the piece: take it out of the mould slowly and without tugging.
- Encapsulate. Key-Cap encapsulator forms a film over the silicone which, at the edge, becomes the key to everything: it dissolves with acetone, and that is what allows it to be melted into the skin until it is invisible. It also prepares the surface to take make-up.
If you buy ready-made prosthetics, look for pieces with an encapsulated edge, such as the Suture Set by Ricard MUA FX, which come ready to blend with acetone.
Prepare the skin
- Degrease. Clean the area with isopropyl alcohol and wait until it is completely dry. This is the step most often skipped and the one that lifts the most edges.
- Check for hair. On hairy areas, consider shaving: the edge will be cleaner and removal less uncomfortable.
- Oily skin: a light layer of skin sealer before the adhesive improves grip.
- Patch test. If it's the first time you're using an adhesive on someone, apply a little to the forearm 24 hours beforehand.
Choose the right adhesive
Conventional adhesives don't grip well on cured silicone: you need one formulated for prosthetics on skin. These are the ones available at Feroca:
| Adhesive | Type | When to choose it |
|---|---|---|
| Pros-Aide | Water-based acrylic, medical grade | The standard for silicone and latex prosthetics. Liquid and low viscosity, ideal for very thin edges. Suitable for sensitive skin |
| Telesis 8 Matte | Silicone adhesive, matte finish | When you're going on camera or under set lighting and a shiny adhesive would give the edge away. Designed for highly mobile areas: cheeks, forehead, chin |
| PROTAC | Prosthetic-grade acrylic | For latex, foam latex and encapsulated silicone gel pieces |
Apply without overdoing the adhesive
- Dry run. Place the prosthetic without adhesive and decide on its exact position before gluing anything.
- A thin coat, never thick. Apply the adhesive as its manufacturer directs: on the skin, on the back of the piece or on both. A glue brush such as the Titanic Pro-FX 116 helps you control the amount. Contrary to what you might think, when an edge lifts after a few hours the cause is usually too much adhesive in that area, not too little.
- Wait until it's tacky. Water-based adhesives such as Pros-Aide go on white and turn clear as they dry. If you stick the piece down while the adhesive is still wet, it slides and the edge won't grip.
- From the centre outwards. Press the centre first and work towards the edges to push the air out. Bubbles trapped underneath end up lifting the edge.
- Extra care on mobile areas. The neck, joints and corners of the mouth are constantly stretching: there, gluing and edge sealing have to be done more carefully.
Blend the encapsulated edge with acetone
This is the step that makes the line disappear, and it only works if the edge is encapsulated (with Key-Cap or on prosthetics that already come with an encapsulated edge). The acetone dissolves the film at the edge and melts it into the skin.
- Use a fine brush barely dampened with acetone, never soaked.
- Work in small sections. Move gradually along the edge, without trying to do it all in one pass.
- Brush outwards, from the edge of the prosthetic towards the skin, until the transition is imperceptible.
- Don't overdo it. Too much acetone damages the encapsulation and can lift an edge that was already stuck down. If you notice the edge softening too much, stop and let it evaporate.
Caution: acetone is highly volatile and flammable. Work in a well-ventilated space, away from any flame, and never near the eyes. Use it only on the encapsulated edge: don't apply it directly to the silicone or use it to clean the prosthetic.
Fill and seal the join
If a small step can still be made out after blending the edge, fill it with Pros-Aide Cream. For very thin edge areas, thin it with a little distilled water until it spreads in an almost invisible layer, and smooth it with a spatula or brush. An extra coat over the edge also helps to seal it in areas that move a lot.
Paint without flaking
This is where the most common mistake happens: platinum silicone does not accept water-based paints or conventional acrylics. They may look fine at first, but they crack and flake as soon as the prosthetic moves. There are two approaches that do work:
- Alcohol-activated make-up on the encapsulated prosthetic. Palettes such as Skin Illustrator are activated with 99% isopropyl alcohol or with Skin Illustrator Activator, and once dry they withstand sweat and rubbing. On platinum silicone it is essential that the surface and edges are encapsulated: without encapsulation the pigment does not adhere evenly. Do not use 70% alcohol, acetone, MEK or water to activate them.
- PAX Paint. By mixing Pros-Aide Cream with water-based acrylic pigments in a ratio of roughly 1:1 you get a flexible, water-resistant paint with strong adhesion, used to colour prosthetics that are already applied.
For the transition between prosthetic and skin, work in thin, overlapping layers, dabbing with a stippling brush such as those in the Titanic FX Stipple Squad, adjusting the opacity with the amount of activator until the edge disappears. The Skin Illustrator On Set Bald Caps palette is designed precisely for matching and blending bald caps and prosthetics to the skin tone. If the finish is shiny, matte it down so the light doesn't trace the line of the edge.
Remove the prosthetic without tearing the edge
The encapsulated edge is the most delicate part of the piece, and it's where most prosthetics get damaged on removal. If you want to reuse it, removal matters as much as application:
- Use an adhesive remover. Isopropyl Myristate or Ben Nye Bond Off, applied to the edge with a brush or cotton bud.
- Let it work. Wait a few seconds (with Bond Off, at least 10-15) before you start lifting.
- From the edges to the centre. Work the remover under the edge and lift the piece little by little, adding more product as you go. Never pull it off dry.
- Clean the piece with the remover, never with acetone directly on the silicone, and store it clean.
Common problems and how to fix them
| Problem | Most likely cause | Solution |
|---|---|---|
| The edge lifts after a few hours | Too much adhesive, oily skin or a highly mobile area | Thin coat, degrease with IPA and seal the edge with Pros-Aide Cream |
| A shiny line shows around it | Adhesive or sealer with a gloss finish | A matte adhesive such as Telesis 8 Matte and mattify the final finish |
| A step is visible between prosthetic and skin | Edge too thick or not blended | Blend the encapsulated edge with acetone and fill with thinned Pros-Aide Cream |
| The paint cracks or flakes | Water-based acrylics on silicone or a non-encapsulated prosthetic | Encapsulate and use alcohol-activated make-up or PAX Paint |
| The edge broke down while blending | Too much acetone at once | A barely dampened brush and small sections |
| The edge tears when removing the prosthetic | Pulling it off dry or not waiting for the remover | Remover on the edge, wait and lift from the edge towards the centre |
Frequently asked questions
How do you blend the edges of a silicone prosthetic?
With an encapsulated edge, for example using Key-Cap, and melting it with acetone applied with a fine brush, in small amounts and working outwards, until the transition disappears. If any step remains, it is filled with thinned Pros-Aide Cream and the colour is then blended in with alcohol-activated make-up.
Why does the edge of my prosthetic lift?
The most common causes are skin that hasn't been degreased, adhesive applied while still wet, air bubbles under the piece or, surprisingly, too much adhesive in that area. On areas with a lot of movement, such as the neck or jaw, it is also a good idea to seal the edge with Pros-Aide Cream.
What paint can be used on a silicone prosthetic?
Platinum silicone does not accept water-based paints or conventional acrylics, which flake off with movement. What works is encapsulating the prosthetic and painting it with alcohol-activated make-up, such as Skin Illustrator palettes, or with PAX Paint, a mix of Pros-Aide Cream and acrylic pigment.
Which adhesive is best for sticking a silicone prosthetic?
One formulated for prosthetics on skin. Pros-Aide is the standard, suitable for sensitive skin and ideal for very thin edges. If you're going on camera and need a shine-free finish, Telesis 8 Matte stops the adhesive from catching the light along the edge.
Can acetone be used on the skin to blend the edges?
Only on the encapsulated edge and in minimal amounts, with a fine brush that is barely dampened. Work in a well-ventilated space, away from the eyes and any flame, and don't apply it directly to the silicone or use it to clean the prosthetic.
How do you remove a silicone prosthetic without damaging it?
By applying an adhesive remover such as Isopropyl Myristate or Ben Nye Bond Off to the edges, waiting for it to work and lifting the piece little by little from the edges towards the centre. Never pull it off dry, because the encapsulated edge is the most fragile part.
Comments (0)