Shopping Cart
- Cosplay
- 0 likes
- 3264 views
- 0 comments
Making your own moulds is the leap that separates a bought cosplay from one nobody else has. With silicone and alginate you can create creature prosthetics fitted exactly to your face, horns with the exact profile of your sculpture, and elf ears that fit first time without extra adhesive. It's not complicated, but you need to choose the right material for each step.
This guide covers the three main methods: facial moulding with alginate for prosthetic bases, skin moulding with silicone for multiple copies, and sculpted piece moulding for horns and accessories.
Which method you need depending on the piece
Before buying materials, decide what type of mould you're going to make:
| What you want to make | Mould material | Why |
|---|---|---|
| Prosthetic fitted to your face (single copy) | Alginate (Alga-Cast Fast) | Fast, affordable, skin-safe |
| Fitted prosthetic, multiple copies | Lifecast silicone (Body Silk-Cast) | The mould lasts months and allows multiple castings |
| Horns, ears, sculpted props | Mould silicone (EASYPLAT) | Captures sculpture detail, durable |
| Copying a body part for a prop | Silicone or alginate + counter-mould | Depending on whether you need one or several copies |
Method 1: Facial moulding with alginate (for a one-off prosthetic)
Alginate is the entry-level material for lifecasting: you mix it with water, apply it to the skin and it cures in minutes. It's safe, inexpensive and produces moulds with extraordinary detail. The limitation is that the mould is only good for one or two castings — alginate shrinks over time and won't withstand more than a couple of uses.
Perfect when you need a prosthetic for yourself and you're not going to reproduce it more than once.
Materials
- Alga-Cast Fast — short working-time alginate, ideal when the model can't stay still for long. Cures in 3–4 minutes after mixing.
- Alga-Cast Slow — extended working-time version, useful for more complex areas or if you need to work at a relaxed pace.
- Plaster bandages for the rigid counter-mould
- Vaseline to isolate eyebrows and facial hair
Step by step
- Prepare the model. Apply Vaseline to the eyebrows, eyelashes and upper lip hair. It's not necessary on bare skin. If you're making a full-face mould, place drinking straws in the nostrils so the model can breathe throughout the process.
- Mix the alginate. Follow the ratio shown on the packaging (usually 1 part powder to 2–3 parts lukewarm water). Mix quickly and without lumps — the reaction starts the moment it contacts water.
- Apply to the skin. Wearing gloves, spread the alginate over the area to be moulded with gentle movements from the centre outwards. Make sure there are no air bubbles around the nose, eyelids or lips. The model must stay still, with muscles relaxed in the expression you want to capture.
- Wait for it to cure. Alga-Cast Fast will be ready in 3–4 minutes from the point the mixture loses its shine. The alginate changes texture: it stops being tacky and holds a pinch without deforming.
- Reinforce with a counter-mould. Before demoulding, apply two or three layers of plaster bandage over the cured alginate. The rigid counter-mould is essential — without it, the alginate distorts when you remove it and loses the exact shape of the face.
- Demould carefully. Ask the model to make gentle facial movements (raising the eyebrows, puffing out the cheeks) to release the mould. Remove the counter-mould first, then the alginate.
- Cast immediately. Alginate shrinks fast — cast the piece within the first 2 hours. You can use plaster, resin or Silicone X for the final prosthetic.
Method 2: Skin moulding with silicone (for multiple copies)
When you need more than one copy — for example, making the prosthetic in several materials or duplicating it for multiple conventions — lifecasting silicone is the right choice. The mould lasts months and allows dozens of castings without losing detail.
Materials
- Body Silk-Cast — self-releasing platinum silicone, specially formulated for direct skin contact. It releases from hair on its own without the need for Vaseline. Working time: 6 minutes, cured in 20 minutes.
- EASYGEL Silk Cast — an alternative from the EasyGel range with a thixotropic formulation (non-drip), very useful for vertical areas such as the forehead or sides of the face.
- Plaster bandages for the counter-mould
Important note: Do not apply these silicones over skin that has traces of latex, sulphur-containing creams, cyanoacrylate adhesives or uncured paints. These can inhibit the cure and leave the silicone tacky.
Step by step
- Clean the skin. The area must be completely clean — no creams, make-up, sweat or oils. Wash with water and mild soap and dry thoroughly. Don't apply Vaseline: the silicone is self-releasing and you don't need it, and Vaseline can interfere with detail capture.
- Mix the silicone. Both parts in a 1A:1B ratio by weight or volume. Lifecasting silicone is thixotropic — thicker than standard pour silicones — which allows it to be brush-applied without dripping.
- Apply with a brush. First thin coat from the centre of the face outwards. This layer captures all the detail of the skin — pores, wrinkles, folds — and is the most important one. The following coats (2–3 more) simply add thickness and strength.
- Apply the plaster counter-mould. Once the last layer of silicone has cured, apply the plaster counter-mould on top. Unlike alginate, here you can take as much time as you need — silicone doesn't shrink.
- Demould. The model makes gentle facial movements to release the silicone. No Vaseline needed: Body Silk-Cast and EASYGEL Silk Cast release from hair on their own. Remove the counter-mould first, then the silicone.
- Store the mould. Clean the inside with soapy water, dry it thoroughly and store it in the counter-mould to keep its shape. Well cared for, it will last months and dozens of castings.
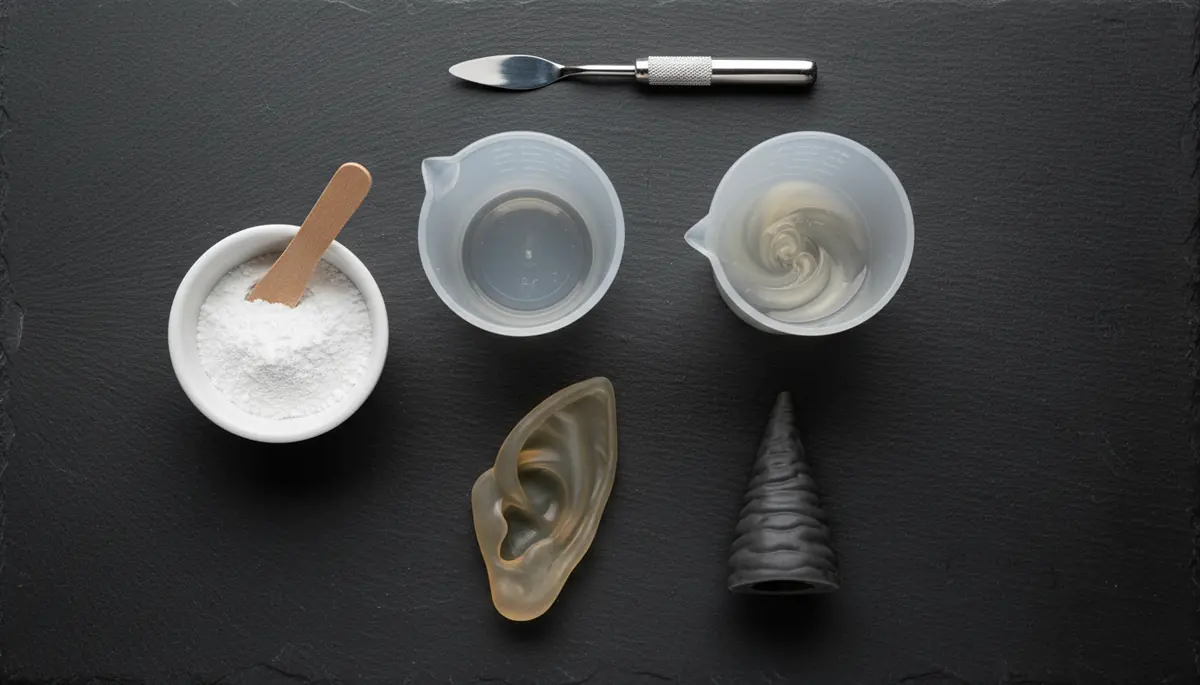
Method 3: Silicone moulding for sculpted pieces (horns, ears, creature prosthetics)
When the piece you're reproducing isn't your face but a sculpture — demon horns, elf ears, a creature nose, scars — the process is different. Here the silicone works on an inert surface, not skin, and you can use harder silicones with finer detail capture.
Materials
- EASYPLAT 00-30 — ultra-soft silicone (Shore 00-30), translucent, ideal for pieces with very thin edges or complex geometries. Working time: 30–40 min.
- EASYPLAT MOLD-40 — Shore A40 hardness, more resistant, perfect for horn and ear moulds that will be used many times.
- Release agent spray (wax aerosol or Vaseline spray)
- Counter-mould in plaster, resin or fibreglass (depending on the size of the piece)
When to use each one
| Piece | Recommended silicone | Reason |
|---|---|---|
| Elf ears, thin edges | EASYPLAT 00-30 | Softer, captures imperceptibly fine edges |
| Horns with complex geometry | EASYPLAT 00-30 or MOLD-40 | Translucent so you can see the inner piece when cutting |
| Creature prosthetics, heavy use | EASYPLAT MOLD-40 | Harder, more resistant and longer-lasting mould |
Step by step
- Prepare the sculpture. If it's made from sulphur-free clay, no release agent is needed. If it's in plaster, sulphur-containing clay or resin, apply a thin coat of release agent (wax spray or diluted Vaseline) and leave to dry for 10 minutes. Sulphur-containing clay can inhibit platinum silicone — if your clay smells of eggs, don't use it directly.
- Place the sculpture in the mould box. The box can be made of LEGO, wood, reinforced cardboard or any container that seals well. Caulk the joints with clay to prevent liquid silicone from escaping.
- Mix the silicone. 1A:1B ratio by weight or volume. Mix for 2–3 minutes with a plastic or wooden spatula, scraping the sides and bottom of the container thoroughly. If you have a vacuum chamber, degas for 1–2 minutes before pouring.
- Pour slowly. Pour the silicone from the lowest point of the sculpture in a thin, continuous stream. Let the material rise naturally around the piece without forcing it — this keeps air bubbles to a minimum. For horns or elongated pieces, tilt the box slightly.
- Cure and demould. EASYPLAT 00-30 cures in 3–4 hours at room temperature. EASYPLAT MOLD-40 in around 3 hours. Once cured, demould carefully — the silicone is flexible and can be removed from geometries with slight undercuts. Make a zigzag cut if the piece is completely enclosed.
- First test casting. Before casting the final material, do a test casting in plaster to check that the detail is correct and there are no bubbles in critical areas.
How to cast the final piece in silicone
If the final prosthetic or prop needs to be flexible with a skin-like feel, the casting is done in FX silicone, not plaster or resin. This is where the EasyGel range comes in:
- EasyGel FX00 — Shore 00-30, ultra-soft. For prosthetics worn on the skin that need a completely natural feel.
- EasyGel FX10 — Shore A10, slightly firmer. For horns and ears that need to hold their shape while still remaining flexible.
Mix 1A:1B, pour into the mould and leave to cure. The demould time for EasyGel FX00 is 1 hour; for FX10, also 1 hour. Once demoulded, the piece can be painted with silicone-specific paints and tinted with silicone pigments.
Summary table: materials by piece
| Piece | Mould | Final casting |
|---|---|---|
| Facial prosthetic (1 copy) | Alga-Cast Fast | EasyGel FX00, plaster or Silicone X |
| Facial prosthetic (multiple copies) | Body Silk-Cast or EASYGEL Silk Cast | EasyGel FX00 or FX10 |
| Sculpted horns | EASYPLAT 00-30 or MOLD-40 | EasyGel FX10 (flexible) or rigid resin |
| Elf ears | EASYPLAT 00-30 | EasyGel FX00 (thin edges, soft feel) |
| Scars and skin textures | Alga-Cast or lifecast silicone | EasyGel FX00 |
| Hand copies for props | Body Silk-Cast | Silicone X or plaster |
Usage tips
Temperature and curing
Platinum silicone is sensitive to temperature: heat speeds up the cure and cold slows it down. In summer, at 28–30 °C, working time can be halved. Work in a space at 20–24 °C if you can. To slow down curing in summer, chill the components in the fridge for 30 minutes before mixing.
The counter-mould is not optional
Whether you're using alginate or lifecast silicone, the plaster counter-mould is essential. Without it, the mould distorts when you remove it and you lose the exact shape of the face. Plaster bandages are the quickest and most cost-effective solution.
Pigmenting the final piece
EasyGel silicones are tinted with silicone-specific pigments before curing. Don't use acrylics or water-based dyes inside the mix — they inhibit the cure. To paint the surface of an already-cured piece, use silicone paints or powder pigments fixed with isopropyl alcohol.
How many copies the mould can handle
A well-maintained EASYPLAT mould can handle between 20 and 50 castings without any appreciable loss of detail. A Body Silk-Cast or EASYGEL Silk Cast mould, between 15 and 30 castings. Alginate, a maximum of 1–2 castings before it shrinks.
Frequently asked questions
Can I use any clay to sculpt the piece I'm going to mould?
No. Platinum silicones are inhibited by clays containing sulphur. If your clay smells faintly of eggs or sulphur, the result will be a tacky silicone that doesn't cure. Use sulphur-free clay (mineral oil- or wax-based clays are safe) and if in doubt, run a small test: apply a little silicone to the clay and wait the indicated cure time before making the full mould.
Is there a difference between pharmacy alginate and Alga-Cast for cosplay?
Yes. Dental alginates from pharmacies are formulated for dental impressions: they cure very quickly (1–2 minutes), are hard to control over large surfaces and are not designed for application on the skin over large areas like the face. Alga-Cast is formulated for lifecasting: more controlled working time, simpler ratios and certified for use on human skin.
Can a silicone mould be reused to cast different materials?
Yes. An EASYPLAT mould can be used to cast plaster, polyurethane resin, epoxy resin, latex, wax, FX silicone or low-melting-point metals. Silicone doesn't adhere to almost any material, so demoulding is always clean. Only apply release agent if you're using epoxy or polyurethane resin with a high exothermic temperature.
What do I do if the silicone is still tacky after curing?
It's inhibition — some contaminant has blocked the platinum catalyst. The most common causes are sulphur from clay, uncured latex, certain adhesives, or residual creams or soaps. The mould can't be fixed and must be discarded. To prevent it, clean all surfaces thoroughly and always run a compatibility test before making the full mould.
Can I make the counter-mould with dental plaster instead of bandages?
Yes, dental plaster gives a more rigid and precise counter-mould, ideal for facial moulds requiring millimetre accuracy. The downside is that it takes longer to cure and is more expensive. Plaster bandages are perfectly adequate for general cosplay: they cure in 5–10 minutes, are affordable and easy to control.
How much alginate do I need for a full face mould?
For a full face (forehead, nose, cheeks, chin) you need between 300 and 500 grams of dry alginate depending on the thickness you apply. For a half face or just the nose and cheek area, 200–250 grams is enough. Always mix a little more than you think you'll need — alginate can't be reused once mixed.
Comments (0)