
Shopping Cart
- Feroca
- Fibreglass
- 0 likes
- 2814 views
- 0 comments
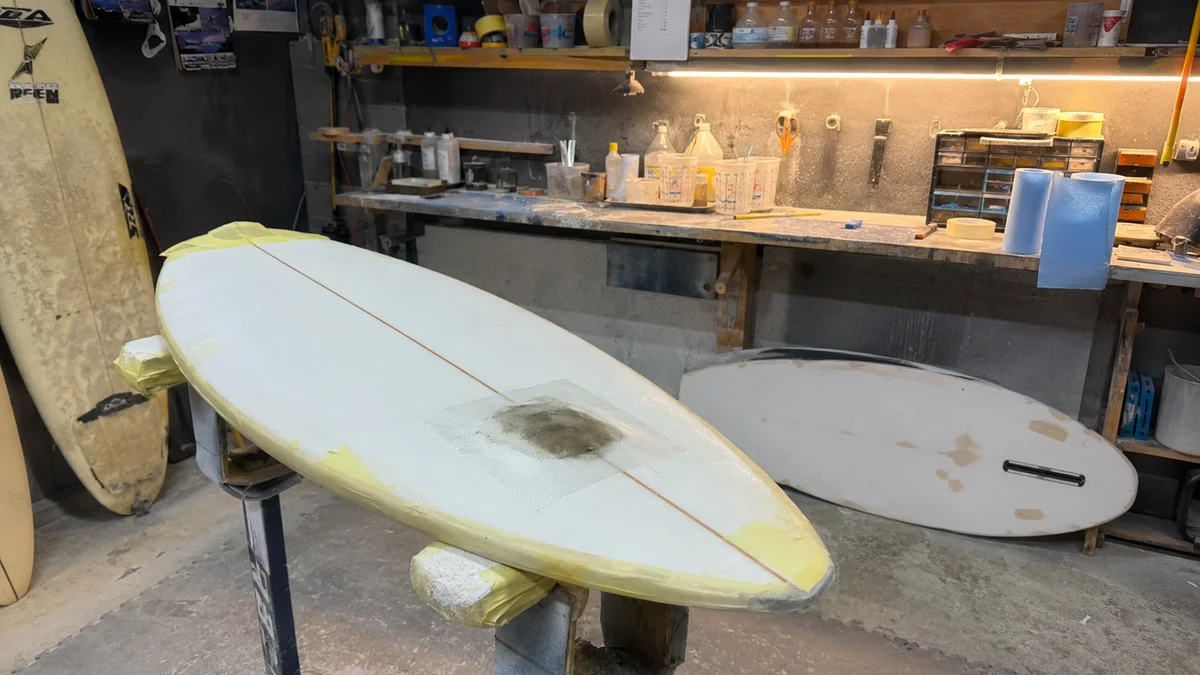
A crack in the bottom of a kayak or a knock that has chipped the rail of a surfboard is no reason to throw the piece away. With polyester resin and fibreglass they can be repaired over a weekend and end up stronger than they were before the damage. What sets this apart from other fibreglass repairs —such as a swimming pool or a tank— is that here you are working on a curved, thin surface, often with a foam core underneath, and out in the open air. In this guide we explain step by step how to get it right first time.
Why this repair is different from other fibreglass pieces
Repairing a surfboard or a kayak with fibreglass differs from other polyester repairs —such as a crack in a swimming pool— in three ways: the surface is curved and thin, many boards have a foam core (EPS or PU) that cannot get wet or take too much heat, and you will almost always be working outdoors, with the ambient temperature dictating the cure time. A kit designed for flat, thick surfaces falls short here: you need lighter fibre to follow the curves without wrinkling, and a process that minimises the time the foam is exposed to liquid resin.
Polyester or epoxy: most production surfboards are made with polyester resin over a polyurethane (PU) core, so repairing with polyester is the compatible and most economical choice. If your board has an EPS core (common in "pop-out" boards or factory epoxy boards), polyester resin can attack the EPS foam as it cures: in that case use an epoxy laminating resin instead. When in doubt, test on a hidden spot.
Materials you need
For most knocks and cracks in surfboards and kayaks, the complete repair kit plus a light fibre for the curved areas is all you need. If the hole is large, add fibreglass filler to rebuild the volume before laminating.
| Product | What it is used for | Format |
|---|---|---|
| Polyester Resin Repair Kit | Everything needed for small and medium knocks in a single kit | 1 kg resin + 300 g/m² mat + roller + acetone |
| Woven Fibreglass 105 g/m² | Light, flexible patch for rails and curved areas | Plain weave, easy to wet out |
| CRC Fibreglass Filler | Rebuild volume in holes larger than 12 mm before laminating | 1 kg, 2 components |
| Surface Veil 34 g/m² | Final layer: removes the weave print and leaves a smooth finish | 34 g/m² |
| White Top Coat / White Gel Coat | Final waterproof coat, protects the fibre from water and UV rays | 1 kg kit + catalyst |
| Peel Ply | Optional: leaves a surface ready to paint with barely any sanding | Nylon 83 g/m², 100 cm wide |
Add to the list: wet-and-dry sandpaper (120, 320 and 600 grit), masking tape to mark off the area, nitrile gloves, a respirator for organic vapours and a small container for measuring out the resin. If you are working in a cold workshop or want to speed up the cure, the Accelerator CH8 reduces the gel time; the Catalyst F11 is already included in the kit and in the tins of Top Coat and Gel Coat.
Step 1 — Prepare and dry the damaged area
The most important step on a board or a kayak is to make sure no water is trapped inside the core. It is the number one reason a fibreglass repair fails on this type of piece, and what sets it apart from repairing a solid surface.
- Mark off the damage: use masking tape to mark a 3-4 cm margin around the crack or hole.
- Remove the loose fibre: with a Dremel or coarse sandpaper (60-80 grit), remove splinters and lifted fibre until you reach sound material.
- Check for water in the core: if pressing around the knock releases moisture or the area looks darker, leave the board to dry in a shaded, ventilated spot for between 24 and 72 hours before continuing. Applying resin over damp foam traps the water inside and the repair ends up failing.
- Bevel the edges: sand a tapered ramp (120 grit) all around the damaged area, extending it 2-3 cm beyond the hole. This bevel is what allows the fibre patch to sit flush so there is no visible step.
- Degrease: wipe the whole repair area with acetone to remove wax, sun cream or grease. Without this step the resin will not bond properly.
Step 2 — Cut and bond the fibreglass patch
For curved surfaces such as the rail of a board or the hull of a kayak, the woven fibreglass 105 g/m² conforms better than the 300 g mat in the standard kit: it weighs less, is more flexible and does not wrinkle when folded over the curve. For structural repairs on flatter areas of the kayak (bottom, deck) the 300 g mat in the kit is still the right choice.
- Cut 2-3 patches of increasing size: the smallest should just cover the hole, and each following layer 1-1.5 cm larger than the previous one on every side. This stepping stops the edge of the patch from showing.
- Catalyse the resin at 1.5-2% catalyst in summer or at temperatures above 25 °C, and at 2-2.5% in cold workshops or below 18 °C (add a few drops of Accelerator CH8 if you need it to gel sooner). Mix only the amount you can use in 10-15 minutes: once catalysed, the resin starts to harden and cannot be reused.
- Apply a first coat of resin over the bevelled area with a brush or a deairing roller.
- Place the smallest patch and wet it out thoroughly with resin, working the roller over it to drive out air bubbles. Repeat with each following layer, from smallest to largest.
- Finish with the 34 g/m² surface veil over the whole patch: it removes the weave pattern and leaves a smooth base for sanding.
Step 3 — Fill with filler if there is a large hole
When the knock has left a through-hole or foam volume is missing, laminating straight over the gap leaves a sunken area. The CRC Fibreglass Filler is designed precisely for this: it is a two-component polyester filler reinforced with fibre that fills holes larger than 12 mm and sands easily once cured.
Apply it after the first fibre patch (never straight onto bare foam, so it has a solid base to grip), filling slightly above the original level of the piece. Once it has hardened —usually in 20-30 minutes at room temperature— sand it back to restore the original shape and profile of the board or kayak, and carry on with the remaining fibre layers over the top.
Step 4 — Sand and apply the finishing coat
With the laminate cured, the work moves on to restoring the exact shape of the piece and sealing it against water. Start dry with 120 grit to level the step of the patch, move on to 320 to refine the shape, and finish with 600 wet to leave the surface ready for the finishing coat.
For the final seal you have two options depending on the result you are after:
- White Gel Coat: semi-flexible finish, designed to add body and solid colour over the laminate. It is the option if you need to match the board's original tone well.
- White Top Coat: waxed finish that cures on contact with the air (with no residual tacky layer), designed as a final waterproof protective coat.
Apply with a soft-bristle brush in one or two thin coats. If you want to avoid the final sanding almost entirely, lay a Peel Ply over the last coat of resin: peeling it off while warm leaves a matt, even surface ready for a thin finishing coat, with barely any need to sand before painting.
Drying times and when to get back in the water
| Phase | Approximate time |
|---|---|
| Each resin layer gelled (touch-dry, not tacky) | 20-40 min |
| Ready to sand | 2-4 hours |
| Cured enough for light use (small waves, no impacts) | 24-48 hours |
| Fully cured, maximum strength | 5-7 days |
These times are a guide at 20-25 °C: at lower temperatures the cure takes longer, and with Accelerator CH8 or a higher catalyst percentage it can be shortened. If you are going to compete or push the board to the limit, always wait for the full cure window.
Tips specific to surfboards and kayaks
Work in the shade, not in direct sun
Direct sun on a dark board can raise the surface temperature well above the ambient one, speeding up the resin's gel before you have finished applying it and driving out the air. Always work in the shade or in a covered space.
Fewer, thinner layers are better than one thick one
On pieces that will flex in the water (surfboards above all), several thin layers of light fibre withstand repeated knocks better than a single thick layer of mat: they bow less and do not leave a rigid area that breaks the board's natural flex around the repair.
Protect the core first of all
If the core is EPS foam (white, made of beads) test with some leftover resin in a hidden corner before applying over a large area: polyester resin can dissolve EPS. With a polyurethane core (PU, denser and with no visible beads) polyester is compatible without this risk.
Materials at Feroca
In fibreglass and reinforcement fabrics and polyester resins you will find everything needed for this and other repairs. If your project is a flat, thick surface rather than a board or a kayak, take a look too at our guide on how to repair a crack in a swimming pool with fibreglass and the article on what polyester gel coat is and how to use it.
Frequently asked questions
Can I repair a surfboard with the same resin I use for other fibreglass pieces?
Yes, if your board has a polyurethane (PU) core, which is the most common in production boards. The polyester resin in the repair kit works just as it does on a pool or a tank. The only real difference is the fabric: for curved areas it is best to use a lighter fibre (105 g/m²) instead of the 300 g mat, which conforms less well to curves. If the core is EPS, use epoxy resin instead.
How long do I have to wait before getting back in the water after repairing a board?
For light use, without chasing big waves or impacts, between 24 and 48 hours is usually enough at room temperature (20-25 °C). To push the board to the limit or compete, wait for the full cure: between 5 and 7 days. At lower temperatures these times get longer.
What do I do if the core foam is wet?
Do not apply resin until it is completely dry: if water is trapped inside, the repair will fail and the moisture will keep damaging the core from within. Leave the board or kayak in a shaded, ventilated spot, with the damaged area facing down to aid drainage, for between 24 and 72 hours before starting to laminate.
Can I use epoxy resin instead of polyester to repair a surfboard?
Yes, and it is essential if the core is EPS foam, because polyester resin can dissolve it. Epoxy resin is compatible with any type of core, has better adhesion and less shrinkage, although it is usually more expensive and cures a little more slowly than polyester.
What weight of fibreglass should I use for a kayak?
It depends on the area. For the bottom and flat load-bearing areas, the 300 g/m² mat in the repair kit gives good structural strength. For the hull in curved areas or rails, the woven fibre 105 g/m² conforms better without wrinkling. For heavily used kayaks (white water, rocks) you can combine a layer of heavier fabric, such as the 163 g/m², in the area of greatest wear.
How do I stop the repair from showing in the colour or the finish?
Step the size of the fibre patches (each layer a little larger than the previous one) so there is no marked edge, and always finish with a layer of surface veil before the finishing coat: it removes the weave pattern and leaves a smooth base. If you need to match a specific colour, the Gel Coat can be pigmented before applying; for transparency over exposed fibre, use the Top Coat unpigmented.
Comments (0)