
Shopping Cart
- Feroca
- Fibreglass
- 0 likes
- 4572 views
- 0 comments
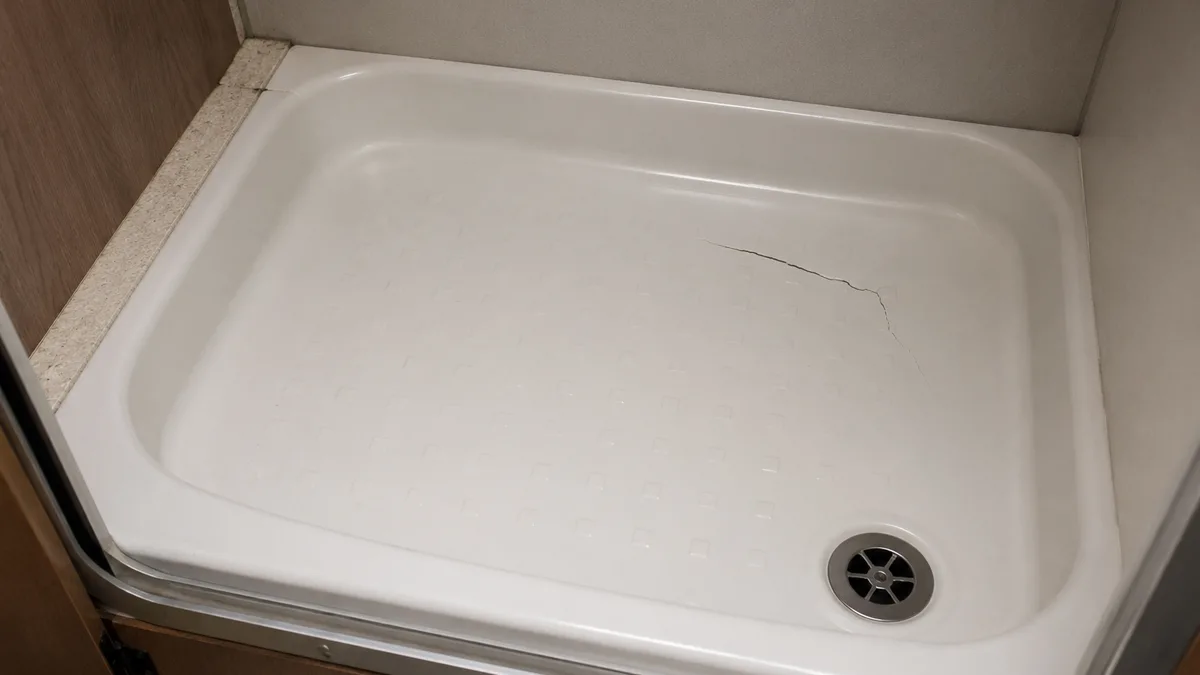
A crack in the water tank or a fissure in the shower tray are two of the most common faults in a motorhome or caravan, almost always caused by the constant flexing of the chassis and road vibration. The good news is that, if you correctly identify the material you're working on, they can be repaired with a fibreglass patch and polyester resin just like on a boat hull or a swimming pool, with the difference that here you're working on a curved, thin surface, in a very tight space and, in the case of the water tank, with the added precaution of contact with drinking water. In this guide we explain how to do it properly, step by step.
Why this repair is different on a motorhome
Repairing a motorhome's water tank or shower tray with fibreglass is a laminating job just like a swimming pool or a boat hull, but with three conditions specific to the vehicle: you're almost always working lying under the chassis or squeezed into a technical locker with very little room, the part is usually a curved, thin-walled surface, and the tank can be made of very different materials depending on the make and year of the vehicle. Before mixing a single drop of resin, the step that makes the difference between a lasting repair and one that opens up again on your next trip is correctly identifying that material.
How to identify the material with the shaving test: sand a small, inconspicuous spot with 80-grit paper. If fine dust comes off and you can see layers of fabric or mat under the resin, it's fibreglass (GRP): the process in this guide works exactly like on a boat hull. If instead you get continuous, elongated shavings with a waxy feel, it's polyethylene (PE): polyester resin barely bonds to this plastic, so the patch should only be treated as an emergency exterior reinforcement, never as a definitive seal. Motorhome shower trays are almost always ABS or fibreglass, so this piece usually doesn't have this problem.
Drinking water tank, grey water tank or shower tray: what changes
The circuit you're working on determines what precautions to take, because none of the standard polyester products in this guide are certified for food contact or permanent contact with drinking water.
Important — drinking water: if the crack is in the tank that holds water for drinking or cooking, always repair it from the outer face, so the laminate reinforces the crack from outside without the resin, the catalyst or the top coat ever touching the water. If the damage also affects the inner face of the tank, the safe option is to reserve that tank for non-potable water (cleaning, toilet cistern, grey water) or replace it, rather than coating the inside with polyester resin. There's no such restriction on the grey water tank or the shower tray, because that water is never intended for human consumption.
This distinction doesn't change the laminating procedure itself — it's the same fibreglass patch and the same resin in all three cases — only where you apply it. On a shower tray you can treat the crack from whichever face you prefer, since it will only ever be in contact with washing water.
Materials you'll need
For most cracks and fissures, a complete polyester repair kit plus a lightweight fibre to adapt to the curves of the tank or shower tray is all you need. If there's a loss of volume or a hole, add fibreglass putty before laminating.
| Product | What it's for | Format |
|---|---|---|
| Polyester Resin Repair Kit | Everything needed for small and medium cracks in a single kit | 1 kg resin + 300 g/m² mat + roller + acetone |
| Woven Fibreglass 105 g/m² | Light, flexible patch for the curves of the tank or shower tray | Plain weave, easy impregnation |
| Fibreglass Reinforcement Mat 300 g/m² | Structural reinforcement on flatter areas, such as the base of the shower tray | 300 g/m², good mechanical strength |
| CRC Fiberglass Filler | Rebuild volume in holes larger than 12 mm before laminating | 1 kg, 2-part |
| Surface Veil 34 g/m² | Final layer: removes the fabric weave pattern and leaves a smooth finish | 34 g/m² |
| White Top Coat / White Gel Coat | Waterproof final coat, protects the laminate from water and from the elements under the vehicle | 1 kg kit + catalyst |
Add to the list: wet-and-dry sandpaper (80, 120 and 320 grit), AC-1 Acetone to degrease and clean tools, masking tape to mark out the area, nitrile gloves and, very important when working in an enclosed space such as a technical locker or under the chassis, an organic vapour respirator mask: the styrene in the resin builds up much more in a tight space than outdoors. If you're working in a cold workshop, Accelerator CH8 reduces gel time; Catalyst F11 is already included in the kit and in the Top Coat and Gel Coat tins.
Step 1 — Locate the crack and dry the area
As with any fibreglass repair, the biggest enemy isn't the crack itself but the moisture trapped inside it. On a water tank this is even more critical than on other parts, because the leak has been wetting the area from the inside for a while before you spot it.
- Empty the tank completely and, if possible, remove it or at least release the mounting straps so you can turn it and reach the whole crack properly.
- Find the full extent of the damage: fatigue cracks are usually longer than they appear at first glance. Run a finger dipped in soapy water over the whole suspect area; bubbles show you where the crack continues.
- Mark out the area with masking tape, leaving a 3-4 cm margin all around the crack.
- Let it dry completely in a ventilated spot, with the damaged area facing down to help drainage, for 24 to 48 hours before laminating. Applying resin over damp plastic stops it curing properly and the repair opens up again within a few weeks.
- Bevel the edges by sanding at an angle (80-120 grit) about 2-3 cm beyond the edge of the crack, so the patch sits flush and doesn't leave a step.
- Degrease with AC-1 Acetone across the whole area to be repaired, paying special attention to any grease from the plumbing or from tank cleaning products.
Step 2 — Cut and apply the fibreglass patch
On curved surfaces like a tank wall or the bottom of a shower tray, woven fibreglass 105 g/m² conforms better than the 300 g mat from the standard kit, because it's lighter and doesn't wrinkle when bent. Save the 300 g/m² mat for flatter areas with more mechanical load, such as the base of the shower tray where you stand.
- Cut 2-3 patches of increasing size: the smallest should just cover the crack, and each following layer 1-1.5 cm bigger on each side. This staggering stops the patch edge from showing and spreads the stress better.
- Catalyse the resin at 1.5-2% catalyst in summer or above 25 °C, and at 2-2.5% in cold spaces or below 18 °C, common if you're working under the vehicle in winter. Only mix the amount you'll use in 10-15 minutes.
- Apply a first coat of resin over the bevelled area with a brush or small roller, suited to the tight space you're working in.
- Place the smallest patch and soak it well with resin, running a de-airing roller over it to remove bubbles. Repeat with each following layer, from smallest to largest.
- Finish with the 34 g/m² surface veil over the whole patch, to remove the weave pattern and leave a smooth base before the finish.
Step 3 — Fill with putty if there's a loss of volume
When an impact or material fatigue has left a through hole or a sunken area, laminating straight over the gap leaves a weak point. CRC Fiberglass Filler solves this: it's a two-part, fibre-reinforced polyester putty that fills holes bigger than 12 mm and sands easily once cured.
Always apply it after the first fibreglass patch, never directly onto bare plastic, so it has a solid base to grip. Fill slightly above the original level of the part; once it has hardened — usually in 20-30 minutes at room temperature — sand it back to the original shape and continue with the remaining fibreglass layers on top.
Step 4 — Sand and seal with a waterproof finish
With the laminate already cured, the goal is to restore the exact shape of the part and seal it against water and the dirt from underneath the vehicle. Start dry with 120 grit to level the patch step, move to 320 to refine the shape and finish with 600 wet-and-dry before the finish.
- White Gel Coat: semi-flexible finish that gives body and solid colour over the laminate. Recommended if the tank or shower tray takes frequent knocks or scrapes from stones and gravel from below.
- White Top Coat: waxed finish that cures on contact with air, with no tacky residual layer. It's the most practical option when working on the outer face of the drinking water tank, since it doesn't need a second coat to remove the tacky feel.
Apply with a soft-bristle brush in one or two thin coats, letting it cover 2-3 cm beyond the edge of the laminate to properly seal the transition with the original plastic.
Drying times and when to use it again
| Stage | Approximate time |
|---|---|
| Each resin layer gelling (touch-dry, not tacky) | 20-40 min |
| Ready to sand | 2-4 hours |
| Top coat / gel coat dry to the touch | 4-6 hours |
| Cured enough to refill the tank or use the shower | 48-72 hours |
| Fully cured, maximum strength | 5-7 days |
These times are approximate at 20-25 °C: at lower temperatures, common if you repair the vehicle in winter or in an unheated garage, curing takes considerably longer. If you're heading off on a trip shortly after the repair, always wait for the full 5-7 day cure window before putting the tank or shower tray under heavy use.
Tips for working in tight spaces
Ventilate the work area actively
A closed technical locker or the gap under the chassis builds up styrene fumes far more than an open workshop. Always work with the locker doors open or with the vehicle raised and accessible from both sides, and add a small auxiliary fan pointing away from the work area throughout the laminating process.
Protect nearby fittings before you start
Wiring, pipework, insulation and straps are usually very close to the tank or shower tray. Cover these with cardboard or plastic before mixing the resin: a drop of catalyst on a cable can damage the insulation, and it's much easier to prevent than to clean up afterwards with your hands stuck in a 30-40 cm gap.
Work with a headlamp and in several short sessions
The awkward posture under the vehicle leads to more mistakes than usual: bubbles not removed, poorly impregnated layers or unbevelled edges. Use a headlamp instead of holding a light in one hand, and if access is very uncomfortable, split the work into short 20-30 minute sessions instead of forcing one long session.
Materials at Feroca
You'll find everything you need for this and other repairs in fibreglass and reinforcement fabrics and polyester resins. If your project is a flat, thick surface rather than a tank or a shower tray, also check our guide on how to repair a crack in a swimming pool with fibreglass, or if you're working on a curved, lightweight part, the article on how to repair a surfboard or a kayak.
Frequently asked questions
Is it safe to repair a drinking water tank with polyester resin and fibreglass?
Polyester resin and top coat aren't certified for food use or permanent contact with drinking water. That's why, if the crack is in the drinking water tank, it must always be repaired from the outer face, so the laminate reinforces the crack without the resin ever touching the water. There's no such restriction on the shower tray or the grey water tank.
How do I know if my motorhome's tank is fibreglass or polyethylene?
Sand a small, inconspicuous spot with 80 grit. If fine dust comes off and you can see fabric layers underneath, it's fibreglass and the process in this guide works just like on a boat hull. If you get continuous shavings with a waxy feel, it's polyethylene: the resin barely bonds to this plastic, so the patch should be treated as an emergency exterior reinforcement, not a definitive seal.
Can I repair a motorhome's shower tray without removing it?
Yes, in most cases. Motorhome shower trays are almost always ABS or fibreglass, and if the crack is accessible from inside the cabin there's no need to remove the piece: just sand, apply the woven fibreglass 105 g/m² patch and seal with Gel Coat. If the crack affects the support structure underneath, it's worth accessing it from below to reinforce that area properly.
How long do I need to wait before refilling the tank after the repair?
For normal use, 48-72 hours at room temperature (20-25 °C) is usually enough. If you're heading off on a trip or want maximum reassurance before putting the tank through the knocks of the road, wait for the full cure: 5-7 days. At lower temperatures, common if repairing in winter, these times get longer.
What's the difference between repairing a drinking water tank and a grey water tank?
The laminating procedure is identical in both cases: the same fibreglass patch, the same polyester resin. The difference is where you can apply the resin. There's no restriction on the grey water tank, because that water is never intended for human consumption. On the drinking water tank, the resin must always stay on the outer face, with no direct contact with the water you'll drink or cook with.
What should I do if the crack is still dripping while I work?
Empty the tank completely and, if possible, cut off the water pump supply before starting. Polyester resin doesn't cure properly over a damp or active surface: any water trapped in the crack turns to vapour during curing and leaves bubbles or unbonded areas. Let the area dry for 24-48 hours in a ventilated spot before applying the first patch.
Comments (0)