Shopping Cart
- Feroca
- Epoxy Resins
- 0 likes
- 7345 views
- 0 comments
Epoxy resin is one of the most versatile materials for working with wood: it seals cracks, creates mirror-like surfaces, allows you to make river tables and improves the structural durability of laminated pieces. Choosing the right type — and applying it correctly — makes the difference between a professional result and hours of wasted work. This guide covers the available resin types, wood preparation, the application process and the most common mistakes.
What epoxy resin for wood is and why it works
Epoxy resin is a two-component system: a base (part A) and a hardener or catalyst (part B). When mixed in the indicated ratio, an exothermic chemical reaction converts the liquid mixture into a rigid, resistant solid. On wood, this material offers three key advantages:
- Mechanical and chemical adhesion: it penetrates the porous structure of the wood and forms a strong physical bond.
- Dimensional stability: with low linear shrinkage (0.1% in laminating formulations), the piece does not warp during curing.
- Moisture resistance: it creates a barrier that protects the wood from water absorption and moisture-related degradation.
UV resistance is a decisive factor for projects exposed to natural light. Without UV inhibitors, any epoxy will yellow over time; that is why formulations intended for decorative use on wood incorporate UV stabilisers as standard.
Types of epoxy resin for wood
There is no universal resin. The right type depends on casting thickness, the desired finish and the mechanical requirements of the piece. These are the three main groups:
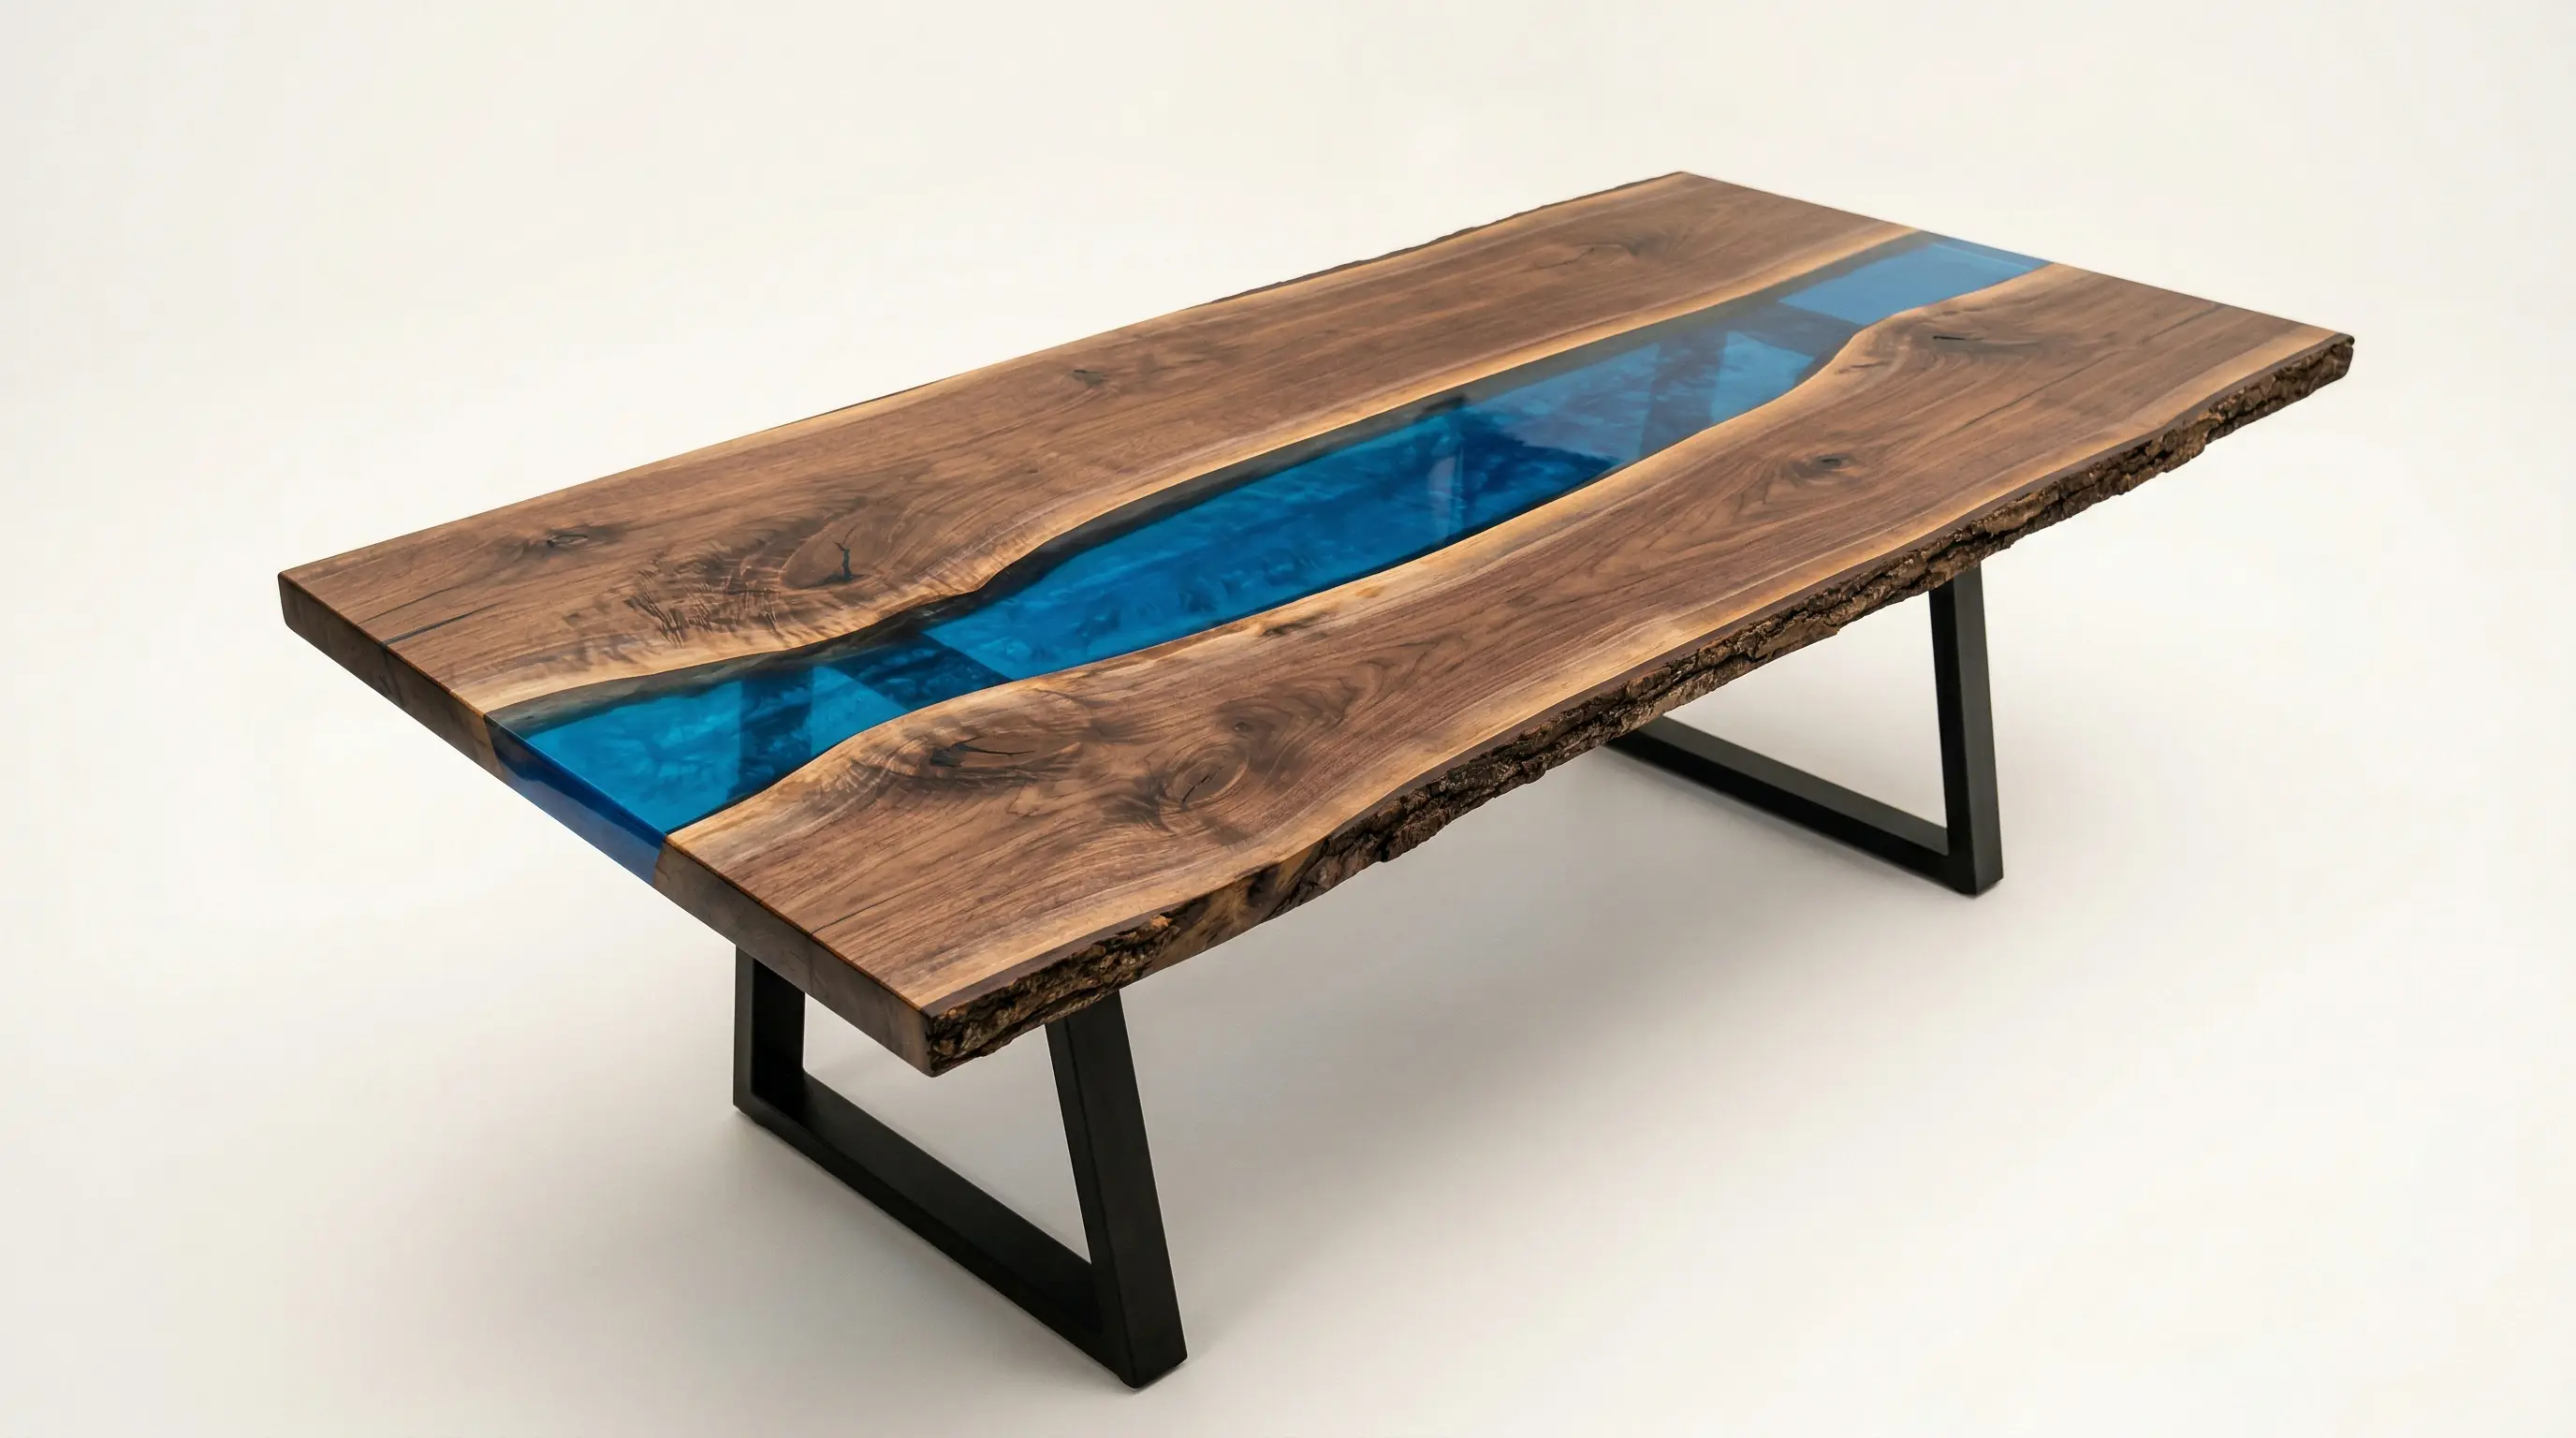
High-thickness resin (Deep Pour): for river tables and thick castings
High-thickness resin is formulated to cure in layers of up to 12 cm in a single casting without overheating. Conventional resins, when a large mass accumulates, generate an exothermic peak that can cause internal cracks or bubbles. Deep pour formulations control that heat through a slower cure.
When to use it: river tables, object encapsulations, high-volume sculptures, filling deep cracks or voids in logs.
The ClearWater Deep Pour allows you to mix up to 60 kg in a single session with a maximum depth of 12 cm. Its mixing ratio is 100A:33B by weight, the working time at 25 °C is 40 minutes and full cure occurs in 24 hours. Once cured it reaches Shore 80D with a flexural strength of 28 kg/mm² and a heat deflection temperature of 80 °C.
| Property | Value |
|---|---|
| Mix ratio (by weight) | 100A : 33B |
| Working time (25 °C) | 40 min |
| Full cure (25 °C) | 24 h |
| Shore Hardness | 80D |
| Maximum thickness per layer | 12 cm |
| UV resistance | High |
Multi-purpose transparent resin: for coating worktops and boards
For surface coatings on wood — kitchen worktops, desk tops, bar counters or decorative surfaces — you need a low-viscosity, self-levelling resin with manageable working times. This type is applied in 2–4 mm layers and provides a mirror-like finish that protects the wood from moisture and wear.
The ClearWater Transparente mixes at a ratio of 100A:100B (equal parts by volume), cures in 8 to 10 hours at 25 °C and reaches Shore 75D. Its low viscosity makes it self-levelling and makes it easy to remove bubbles with a torch or heat gun. It is the standard choice for boards and worktops where aesthetic finish matters as much as resistance.
If the project requires a fast finish or heat deflection temperature is a factor — worktops near heat sources, for example — the ClearWater Super Fast cures in 1–2 hours at 25 °C with a heat deflection temperature of 140 °C. Suitable for coatings up to 2 mm thick.
Laminating resin: for structural reinforcement in wood
When the goal is not decorative but structural — reinforcing a piece of wood with fibreglass, making a composite panel, or building parts where mechanical strength is critical — laminating resins are used. These have high compressive and tensile strength but are not designed for transparent finishes or thick castings.
The Epofer Laminate 401 mixes at a ratio of 100A:16B by weight, with a working time of 90 minutes at 20 °C and cures in 24–48 hours. Mechanical data on the cured resin: Shore Hardness D80, compressive strength 580 kg/cm², tensile strength 460 kg/cm², linear shrinkage 0.1%.
Preparing wood before applying epoxy resin
Preparation is the most critical step. Any impurity — dust, oil, moisture, residual varnish — compromises adhesion and creates visible defects in the final finish.
Cleaning and degreasing
Remove any varnish, wax or oil residue with a cloth soaked in Epoxi Cleaner. This xylene/butanol-based solvent has high dissolving power and is specifically designed for epoxy systems: it cleans moulds, tools and the wood surface itself without leaving any residue that could interfere with adhesion. Allow it to evaporate completely before continuing (at least 15–20 minutes in a well-ventilated area).
Moisture control
Wood must have a moisture content below 12% before applying resin. Trapped moisture generates bubbles during curing as it evaporates under the heat of the exothermic reaction. Use a wood moisture meter if in doubt. For new pieces of green or freshly cut wood, allow at least 3–4 weeks of indoor drying.
Sealing pores (primer coat)
Porous woods — oak, ash, walnut — release air during curing and generate bubbles on the resin surface. To avoid this, first apply a thin coat of the same resin you will be using (slightly thinned with Epoxi Thinner if the viscosity is high), spread it with a spatula or foam roller and allow it to partially cure until it becomes tack (sticky to the touch but not liquid). Apply the final casting over that coat; the adhesion between partially cured epoxy layers is excellent.
Sanding
For wood that has already been treated or varnished and cannot be completely stripped, sand with 80–120 grit paper to create a rough surface that improves mechanical bonding. Remove the dust with a lint-free cloth lightly dampened with Epoxi Cleaner.
Step by step: how to apply epoxy resin to wood
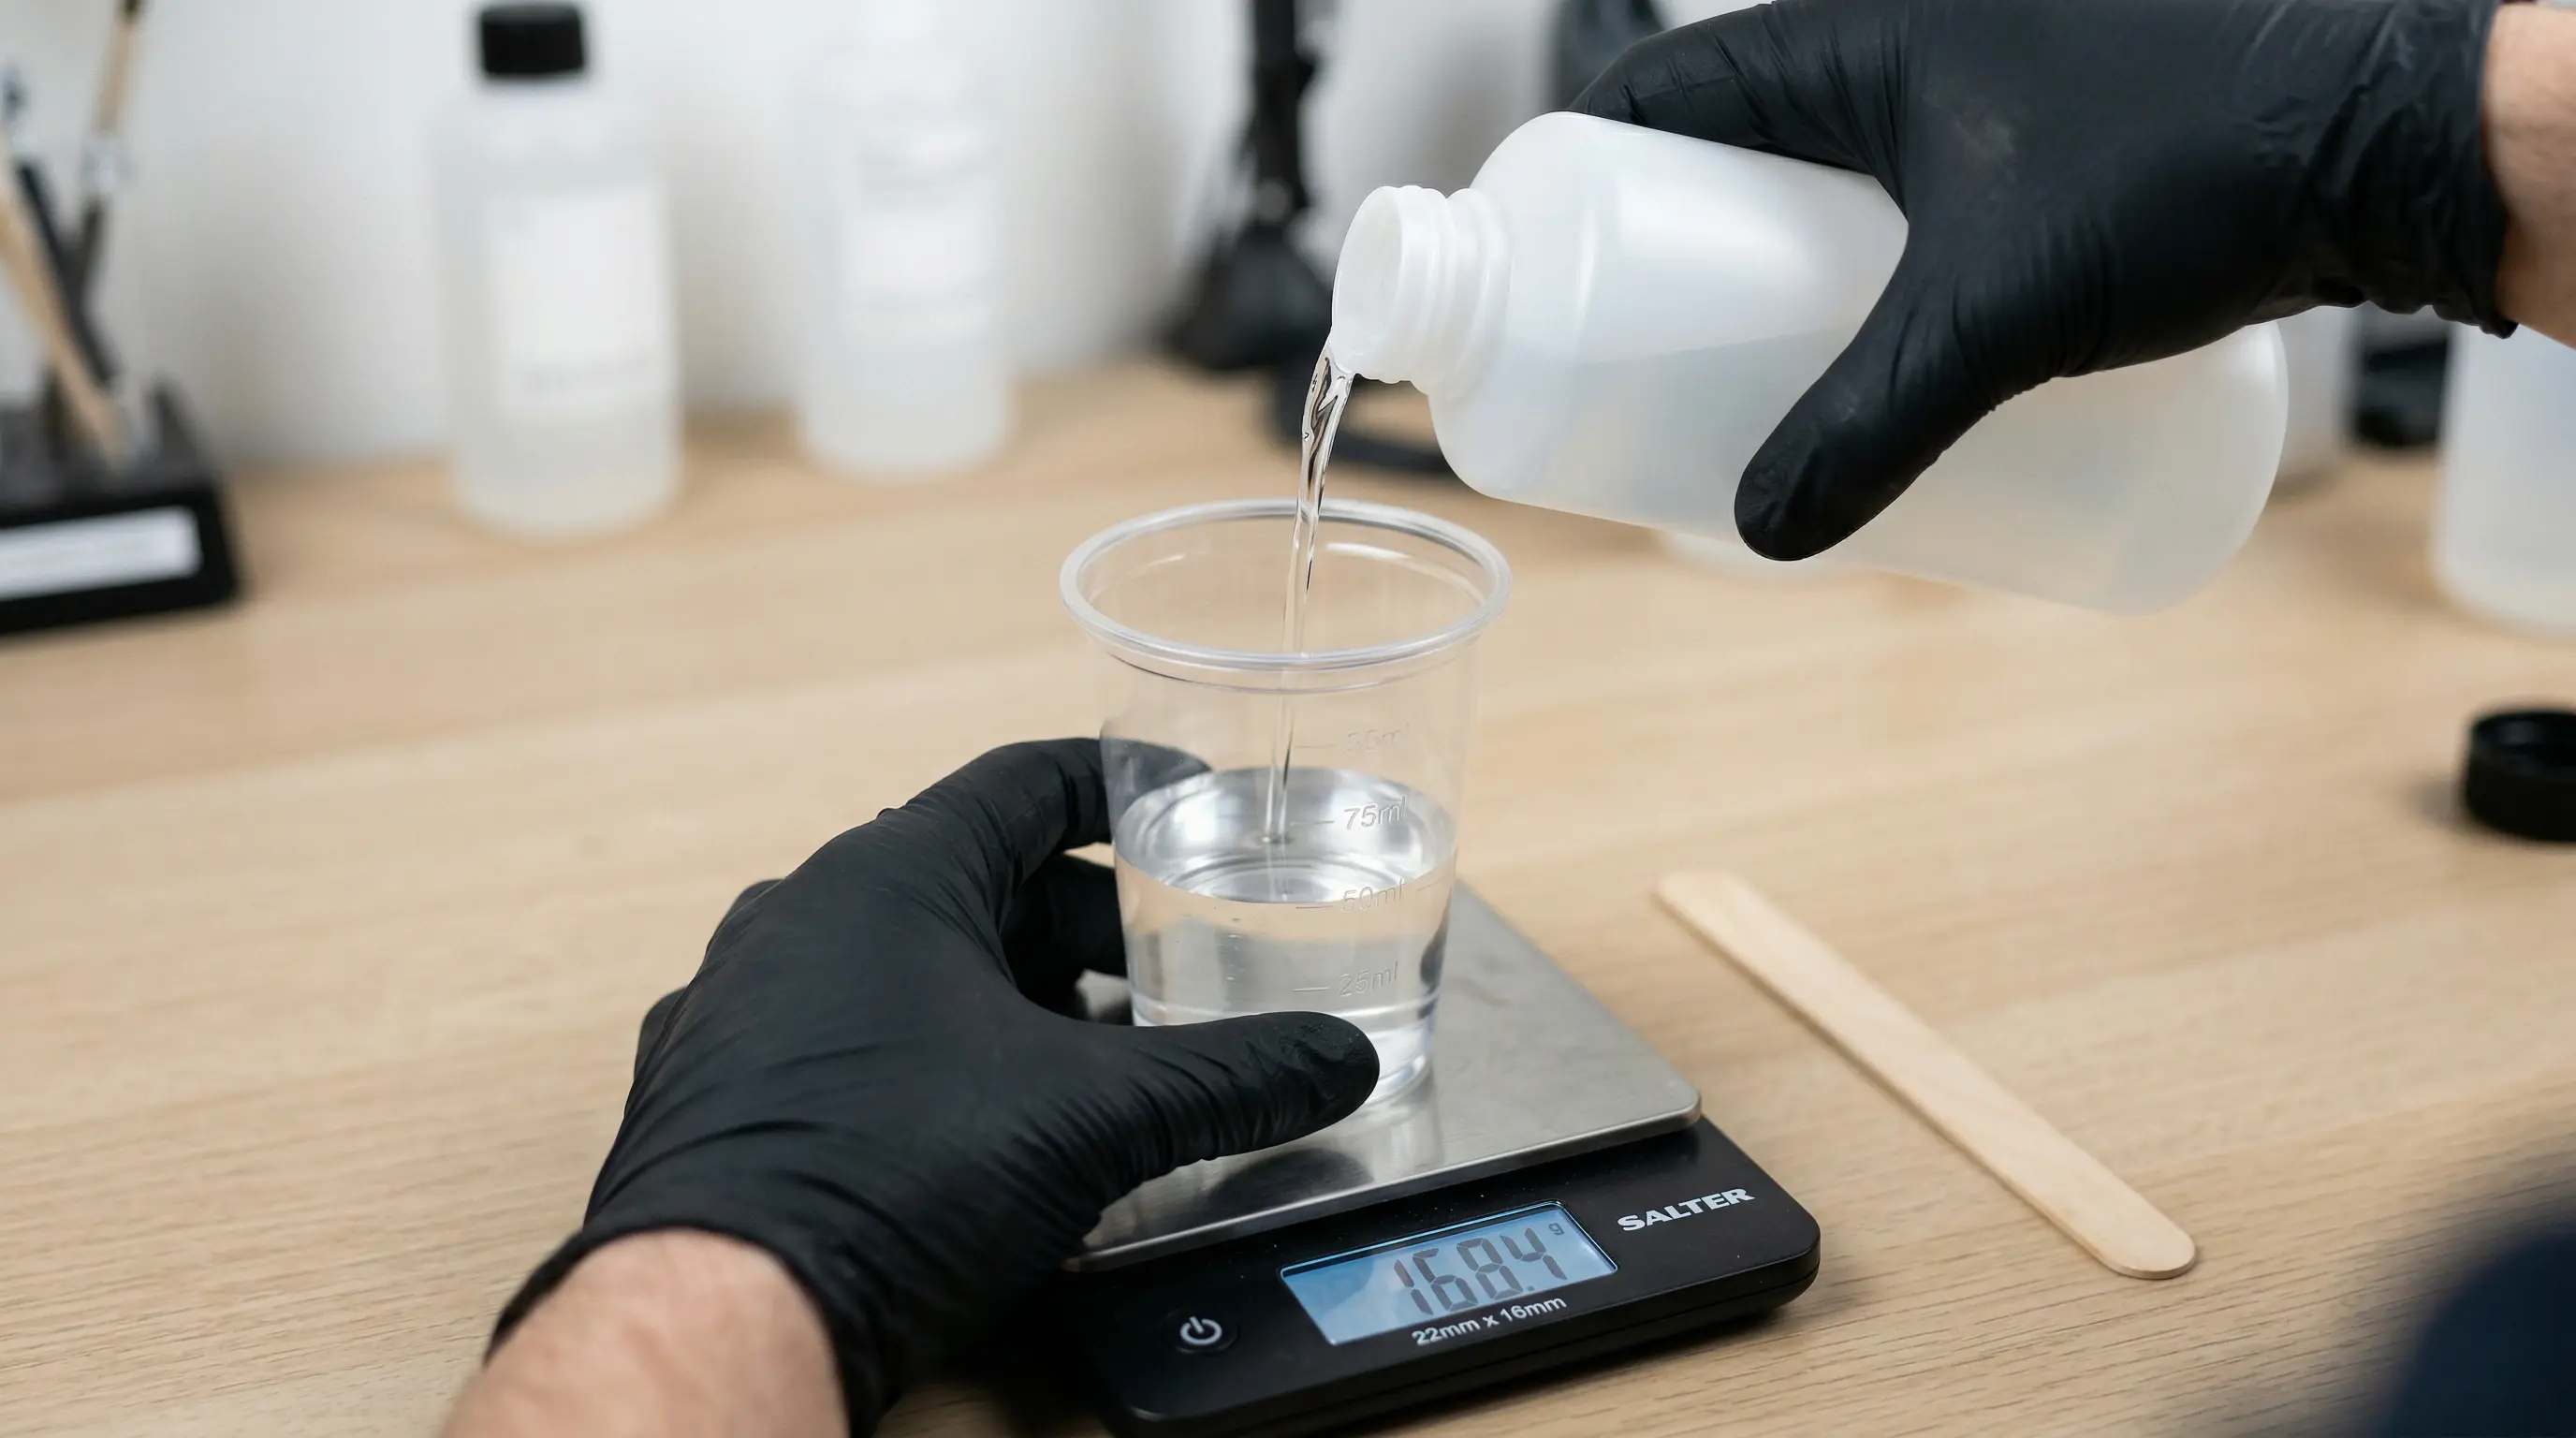
1. Weigh or measure accurately
The mixing ratio is critical. An excess of hardener does not speed up curing; it leaves the resin sticky and soft. Too little leaves unreacted zones. Use a digital kitchen scale for weight-based mixing (the ratios in technical data sheets are by weight unless otherwise stated).
Example for ClearWater Deep Pour: for every 100 g of part A, add 33 g of part B.
2. Bring the components to temperature
At temperatures below 18 °C the viscosity of part A increases noticeably (a granular effect similar to honey or olive oil). This does not mean the resin is defective, but in that state the catalyst does not react correctly and unhardened zones may remain. Place the container near a radiator or immerse it in a water bath until it reaches 20–25 °C before mixing.
3. Mix for 3–5 minutes
Mix slowly to minimise air incorporation, scraping the sides and bottom of the container thoroughly. Incomplete mixing leaves streaks or spots in the cured resin. Transfer to a clean container and mix for another minute (the "double-container" technique) to ensure homogeneity.
4. Pour and distribute
Pour the resin from the centre of the piece and let it spread on its own. For thick castings, pour slowly in a zig-zag pattern to cover evenly. Do not stir or spread with a spatula if the resin is self-levelling: movement introduces bubbles. For laminates, you can spread with a spatula or foam roller to saturate the fabric.
5. Remove bubbles
Pass a propane torch or heat gun 5–10 cm above the surface with quick, circular movements. The heat reduces surface viscosity and the bubbles rise and burst. Do not apply heat to the same spot for more than 2 seconds to avoid scorching the resin. Repeat this process during the first 10–15 minutes after pouring.
6. Cover and allow to cure
Cover with a cardboard box or plastic film (without touching the surface) to prevent dust from settling during curing. The ambient temperature must remain stable: a sudden change can alter the curing kinetics and cause cloudiness or soft spots.
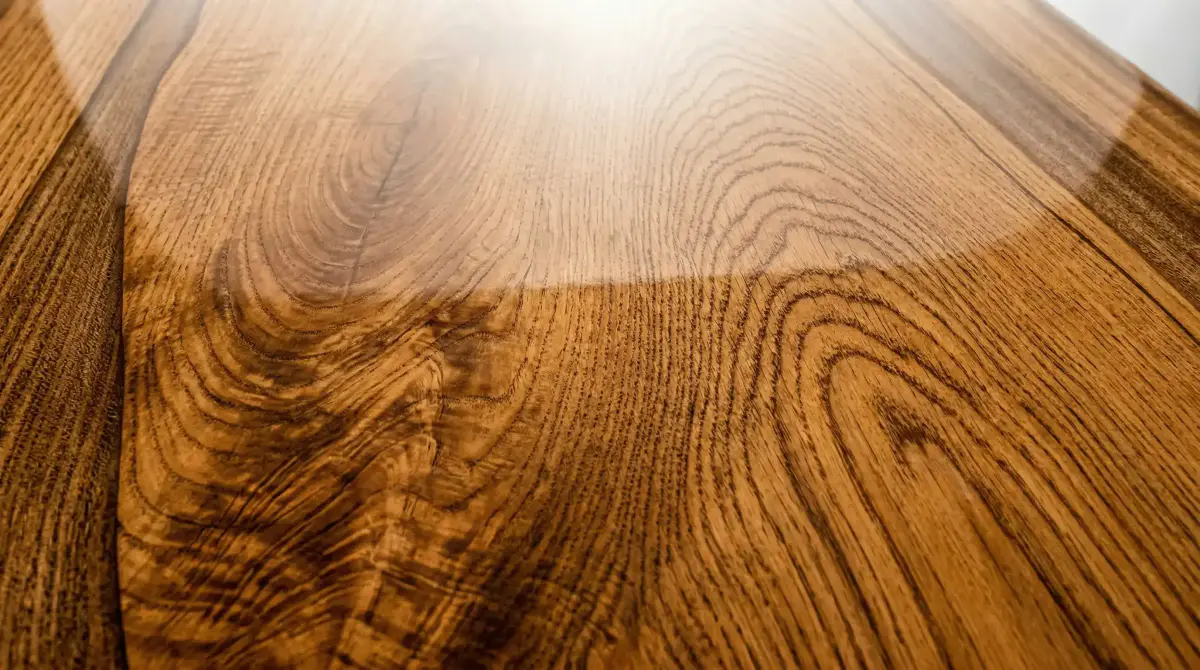
Finishing: sanding and polishing epoxy resin on wood
Once the resin has cured (always wait for the time indicated in the technical data sheet, and add extra time if the working temperature was below 20 °C), the final finish depends on progressive sanding and polishing.
Progressive sanding
Start with 120–180 grit to remove major imperfections (bubbles that were not eliminated, spatula marks, level irregularities). Move to 320, 400, 600 and finish with 800–1000 to create the base for polishing. Between each grit, wipe the surface with a damp cloth to remove abrasive dust before moving to the next.
Polishing with compound
To achieve a mirror finish, use the polishing compounds from the PolarShine by Mirka range:
- PolarShine 35 (coarse): removes fine sanding marks and surface scratches. Designed for composites and high-gloss lacquers.
- PolarShine 10 (medium): intermediate polishing, removes marks left by PolarShine 35. Suitable for all paint systems.
- PolarShine 5 (finishing): high-definition final gloss, removes swirl marks and leaves a mirror finish. Suitable for use by hand or with a machine.
Apply with a microfibre cloth or a low-speed orbital polisher. Do not let the compound dry on the resin; work in sections of 30–40 cm.
How to use epoxy resin to restore or coat wooden furniture
Epoxy resin is particularly useful in furniture restoration because it allows you to consolidate degraded wood, fill cracks and voids, and create protected surfaces without needing to replace the piece. These are the most common uses:
Filling cracks and knots
Natural voids in the grain or drying cracks are filled with transparent casting epoxy (ClearWater Deep Pour for depths greater than 1–2 cm, or ClearWater Transparente for surface cracks). Before pouring, seal the bottom of the crack with masking tape on the underside of the piece to prevent the resin from leaking. Once cured, sand flush with the wood using 120 grit and continue with the standard finishing process.
Protective coating for existing boards and worktops
To protect a finished wooden board or worktop — without changing its appearance, simply adding hardness and water resistance — apply a thin 2–3 mm layer of self-levelling transparent resin. The result is a hard surface that is easy to clean and stain-resistant. The process: clean with Epoxi Cleaner, sand lightly with 120 grit if there is existing varnish, pour the resin and remove bubbles with a torch. No additional varnish coat needed: the resin is the final finish.
Consolidating deteriorated or rotted wood
In pieces with soft areas caused by moisture or insects, low-viscosity epoxy resin penetrates the degraded wood and consolidates it as it cures. First apply the resin without catalyst as a primer (part A alone acts as a consolidant in open pores) and then pour the full mixture. This use is common in the restoration of antique joinery, window frames or decorative beams.
Decorative inlays in furniture
Transparent epoxy allows you to encapsulate decorative elements — leaves, stones, metal pieces — within the wood surface. This is done using perimeter wooden moulds or masking tape to delimit the pouring area. Once cured and sanded, the surface integrates seamlessly with the board.
Common mistakes and how to avoid them
Persistent bubbles: the most frequent cause is that the ambient or component temperature is too low, or the mixture was stirred too aggressively. Solution: bring the components to temperature, mix slowly and use a torch over the freshly poured surface.
Sticky resin after curing: the mixing ratio was incorrect (excess of part A) or the temperature during curing dropped below 15 °C. A sticky resin cannot be fixed: you have to sand back to the wood and start again. Always use a scale and monitor the workshop temperature.
Premature yellowing: the product has no UV filter or has been used outdoors without additional protection. ClearWater resins incorporate UV resistance as standard, but under direct and continuous sunlight, even UV-resistant resins are eventually recommended to have an additional UV varnish coat applied over the cured resin.
Layer separation or delamination: the second layer was applied over the first after it had fully cured and without sanding. Cured epoxy is chemically inert; successive layers bond mechanically, not chemically. Solution: sand the lower layer with 120 grit paper before pouring the next one, or apply within the tack window (partial cure, sticky to the touch).
Internal cracks or fissures in thick castings: excessive exothermic heat from using a standard resin in castings several centimetres deep. Solution: always use Deep Pour resin for thicknesses greater than 2–3 cm.
Tools and accessories you need
For epoxy projects on wood you need:
- Digital scale (minimum precision: 1 g)
- Plastic or cardboard containers for mixing (avoid polystyrene: epoxy dissolves it)
- Silicone spatula for mixing and scraping containers
- Heat gun or torch for removing bubbles
- Sandpaper from 120 to 1000 grit
- Epoxi Cleaner: for cleaning tools, brushes and the wood surface before work
- Epoxi Thinner: thinner to reduce viscosity when spray application is needed
- PolarShine 10, 35 and 5: for the final gloss finish
- Pearl Ex pigments (optional): inert powder pigments for metallic and pearlescent effects on transparent resin; they do not affect curing
Summary: which resin to use depending on the project
| Project | Recommended resin | Thickness per layer |
|---|---|---|
| River table or deep crack filling | ClearWater Deep Pour | Up to 12 cm |
| Coating for boards, worktops or bar counters | ClearWater Transparente | 2–4 mm |
| Worktop with thermal requirements or fast finish | ClearWater Super Fast | Up to 2 mm |
| Furniture restoration and consolidation | ClearWater Transparente | 1–3 mm |
| Structural reinforcement with fibreglass | Epofer Laminate 401 | 2–3 mm per layer |
Frequently asked questions
How much epoxy resin do I need for a river table?
It depends on the volume of the gap between the two halves of wood. The formula is straightforward: length (cm) × width (cm) × depth (cm) × resin density (approx. 1.1 g/cm³) = grams of mixture. For example, a void measuring 150 × 20 × 5 cm requires approximately 16.5 kg of resin. Add a 10–15% margin for spillage and resin left in the container. For ClearWater Deep Pour, the available kit sizes are 2, 6, 20 and 100 kg.
What is the minimum temperature I need to work with epoxy resin on wood?
The working and curing temperature must not drop below 18–20 °C. Below that threshold the viscosity of part A increases noticeably, curing slows down and unhardened zones may remain. If the workshop is cold, bring the components to temperature using a water bath until they reach 20–25 °C before mixing, and make sure the piece cures at a stable temperature. A sudden temperature change during the first 24 hours can cause cloudiness or affect the cure.
Can epoxy resin be applied over treated or varnished wood?
Yes, but the adhesion will be exclusively mechanical. Sand the surface with 80–120 grit paper to create roughness, remove the dust with a clean, degreased cloth, and apply the resin. For oily-treated woods (teak, jatoba), degreasing with Epoxi Cleaner beforehand is essential, as the natural oils in the wood interfere with epoxy adhesion.
Why is my resin still sticky after curing?
The most common cause is an error in the mixing ratio (excess of part A or part B). Epoxy resin requires exact proportions for the chemical reaction to complete; it is not a system that tolerates imprecision. Other causes: curing temperature below 15 °C, or incomplete mixing (the sides of the container were not scraped properly). Sticky resin has no chemical fix; you have to sand back to a sound substrate and redo the application with the correct ratio and a precision scale.
How many coats of epoxy resin are needed for a mirror finish?
For a wooden board coated with epoxy, the standard approach is one sealing coat (primer) to close the pores and a second finishing coat of 2–4 mm. If after curing and sanding there are imperfections or the surface is not completely level, a thin third coat can be applied. For river tables with ClearWater Deep Pour, a single casting of sufficient thickness is usually the solution, followed by a surface coating layer if a mirror finish is desired.
Does epoxy resin yellow over time indoors?
Formulations with UV resistance (such as the entire ClearWater range) minimise yellowing even under intense lighting conditions. Indoors, with artificial light or natural light filtered through glass, yellowing is minimal and very slow with quality resins. Outdoors with direct sun exposure, even UV-filtered resins will eventually show some tint over time; in that case it is advisable to protect the surface with an additional UV varnish coat.
Can cured epoxy resin be sanded and polished?
Yes. Cured epoxy resin sands perfectly with standard abrasive paper, starting with low grits (120–180) to remove imperfections and progressing to 800–1000 before polishing. For a gloss finish, PolarShine compounds (35 for cutting, 10 for mid-stage, 5 for final finish) deliver professional-level results both by hand and with an orbital polisher.
Explore the full range of epoxy resins at Feroca to find the right formulation for your project.
Comments (0)