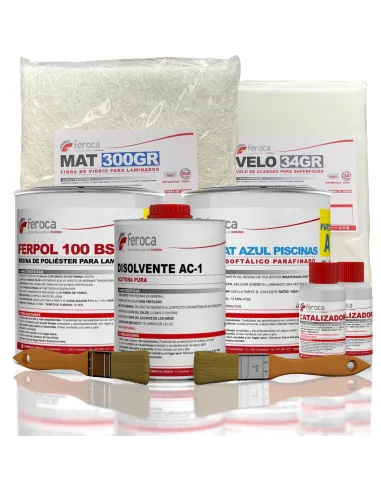
Feroca's Pool Repair Kit brings together in a single package all the materials needed to restore cracks, blisters and damage in fibreglass pools with professional results. Laminating resin, textile reinforcements, blue top coat and solvent are calibrated to work together, with no need to source components separately.
Kit contents
What it is used for
It is designed specifically to repair pool structures built or lined with fibreglass-reinforced polyester. It covers the most common issues that arise from use, ageing or impact:
- Repair of cracks in the shell of fibreglass pools
- Sealing of blisters or delaminations caused by impact or ageing
- Restoration of porous areas or areas with loss of laminated material
- Localised reinforcement of weakened areas before the swimming season
- Integrated final finish with standard pool blue colour using the Top Coat Azul
How to use it
- Prepare the damaged area: sand the affected area to remove the contaminated surface layer and any loose, blistered or detached material. Work until you reach firm, sound substrate. Good preparation is the single most important factor for a lasting repair.
- Clean with AC1 pure acetone: apply acetone with a clean brush or lint-free cloth and allow it to evaporate completely before continuing. Do not touch the cleaned area with bare hands.
- Catalyse the resin: weigh out the Ferpol 100BSX15 and add the catalyst at 1.5% by weight (range 1–2% depending on ambient temperature). Mix thoroughly until you obtain a homogeneous liquid.
- First resin coat: apply a coat of catalysed resin over the prepared area using the brush. This wet coat will act as a base to anchor the reinforcement.
- Apply the fibreglass mat: cut the 300 g/m² mat to pieces suited to the size of the damage and place them over the wet resin. Saturate the fabric thoroughly with more resin and smooth with the brush, eliminating air bubbles. Repeat this step at least 3 times (resin coat + mat) to build up a strong laminate.
- Apply the surface veil: as the final reinforcement layer, place the surface veil impregnated with resin to improve the finish and seal the mat filaments.
- Allow to cure: wait until the laminate is fully cured before continuing. Under normal conditions (20–25 °C) cure time is several hours. Do not work over resin that is still soft or tacky.
- Sand the cured laminate: once cured, sand the surface to level it with the rest of the pool shell and provide adhesion for the top coat.
- Apply the Top Coat Azul: prepare and apply the top coat following its kit instructions to achieve the final watertight finish in standard pool blue.
- Clean the tools: use AC1 acetone to clean brushes and tools before the resin cures on them.
Warning — polyester resin: polyester resin releases styrene during the curing process. Always work in well-ventilated spaces or outdoors. Wear nitrile gloves, safety goggles and a respirator with organic vapour filters. The curing reaction is exothermic: do not catalyse large quantities in closed containers. The catalyst (MEKP) is a strong oxidiser; avoid skin and eye contact and never mix it directly with the accelerator.
Usage tips
Temperature and catalyst
The catalyst ratio determines working time and cure quality. In summer (25–30 °C) use 1% to extend application time. In spring or autumn (15–20 °C) increase to 2%. Below 15 °C curing is very slow and results may be poor; avoid working in extreme cold or warm the work area. Always weigh the components — do not estimate the catalyst by eye.
Surface preparation — the key to success
Pool repairs almost always fail due to poor preparation. Sand generously beyond the visible edge of the damage — at least 3–4 cm all around — to achieve a smooth transition and good adhesion. After sanding, degrease with AC1 acetone and do not touch the area with bare hands again. Any grease or contamination will cause premature delamination.
Top coat finish
The Top Coat Azul Piscinas is the layer that will be in permanent contact with the water and pool treatment chemicals. Apply it with the pool completely empty and dry, and allow the indicated cure time before filling. A properly applied top coat has a smooth, glossy appearance; if it looks matt or porous, the catalysation was incorrect or there was moisture on the surface.
Frequently asked questions
Can I carry out the repair with the pool full or partially full?
No. The pool must be completely empty and the surface perfectly dry before starting any repair with this kit. Moisture prevents the resin and top coat from curing correctly and causes premature repair failure.
How many layers of mat do I need for a strong repair?
For a reliable repair, at least 3 layers of 300 g/m² mat impregnated with resin are recommended. If the damage is deep or structural, add further layers until the original laminate thickness is restored. Always finish with the surface veil to improve sealing and top coat adhesion.
What catalyst ratio should I use?
The standard ratio is 1.5% by weight relative to the amount of resin. Depending on temperature you can adjust between 1% (high temperatures, more working time) and 2% (low temperatures, faster cure). Always weigh the components precisely — do not estimate the catalyst by eye.
Does the resin in this kit work for concrete or tiled pools?
This kit is formulated and optimised for fibreglass pools (laminated polyester). For concrete pools or ceramic-tiled pools the process and materials are different. Please consult us before using this kit on a different substrate.
How long should I wait before filling the pool?
After applying the top coat, wait until it is fully cured and the styrene smell has gone. Under normal conditions (20–25 °C) a minimum of 48–72 hours is recommended before filling the pool. In low temperatures or high ambient humidity, extend this period.
Can I use this kit to repair a fibreglass boat?
The Ferpol 100BSX15 and the lamination technique included in the kit are suitable for repairs on polyester laminates in general, including boats. However, the blue top coat is formulated for pools; for a boat you would need a marine gel coat or top coat in the appropriate colour.
What should I do if the resin has cured with soft or tacky areas?
Soft or tacky areas after curing indicate insufficient catalyst, too low a temperature or surface contamination. Remove the defective laminate by sanding or grinding back to sound material, clean again with AC1 acetone and repeat the process with the correct ratio and temperature.
How large an area can this kit cover?
The kit includes 1 m² of mat and 1 m² of veil, which allows localised damage of moderate size to be covered with the necessary reinforcement layers. For extensive repairs or those requiring many layers, you may need to supplement the kit with additional resin or textile reinforcement purchased separately.
How much product do I need?Calculate the exact amount before buying and avoid wasting material.
Go to the calculator →


