
Shopping Cart
- Feroca
- Fibreglass
- 0 likes
- 2465 views
- 0 comments
A cracked bumper or a motorbike fairing with a broken corner doesn't always mean buying a new part. If they are made of fibreglass —very common on kit car bodies, classic cars, motorhomes and most motorbike fairings— they can be repaired with polyester resin and fibreglass, just like a surfboard or a tank, but with their own particularities: the part is painted, it has no exposed gelcoat, it usually has mounting points that break before the bodywork itself, and it is subject to constant vibration. In this guide we explain how to repair it step by step.
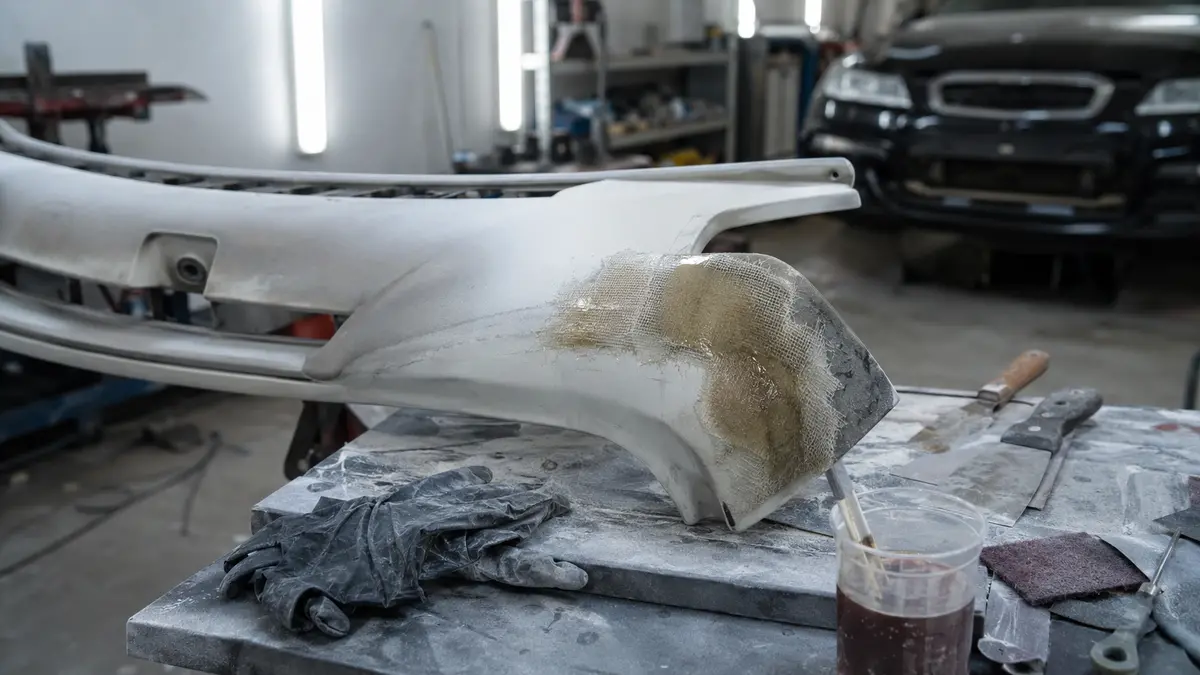
Is it fibreglass or plastic?
Important before you start: most bumpers on today's road cars are plastic (polypropylene, PP), not fibreglass, and polyester resin does not bond well to that material. This guide is for fibreglass (GRP) parts: kit car bodies, replicas and classic cars, motorhome panels, and most original or aftermarket fibreglass motorbike fairings. To find out which material you have, give it a sharp tap with your knuckles: fibreglass sounds stiffer and "drier", while plastic sounds duller and flexes slightly when pressed. If in doubt, sand a small hidden spot: fibreglass leaves a whitish dust and shows glass strands; plastic scratches into shavings.
Why this repair is different from other fibreglass parts
Repairing a bumper or fairing differs from other polyester repairs —such as a crack in a swimming pool or a surfboard— in three specific ways: the part is painted, so the final finish is not gelcoat but a surface ready for priming; it almost always has mounting points or fixing tabs that concentrate the stress and are usually the first place it breaks; and it is subject to the vehicle's constant vibration, which means the laminate must be properly anchored, not just cosmetic.
Materials you need
| Product | What it is used for |
|---|---|
| Polyester Resin Repair Kit | Resin + mat + roller, everything you need for small and medium damage |
| Woven Fibreglass Fabric 163 g/m² | Additional structural reinforcement, especially at mounting points |
| Metal Laminating Roller | Removing air from each layer of fibre when laminating, especially with several stepped patches |
| Special Laminating Brush | Applying the resin evenly over the bevelled area and the patches |
| CRC Fibreglass Filler | Rebuilding volume in large holes and cracks before laminating |
| CRC Cellulose Filler | Final fine finishing coat, before priming and painting |
Add to the list: wet-and-dry sandpaper (80, 180, 320 and 600 grit), masking tape, nitrile gloves, a mask for organic vapours, a small container for measuring out the resin and an angle grinder or Dremel with a cutting disc to remove damaged fibre. If you are going to reinforce small mounting points, some chopped fibreglass strands mixed into the filler or resin add extra strength in that very localised area.
Step 1 — Remove the part and prepare the area
- Remove the part from the vehicle whenever possible: you will work more comfortably, with better access to both sides and no risk of soiling the rest of the bodywork.
- Clean thoroughly with soap and water to remove dirt, wax or tar residue, and let it dry completely.
- Remove the paint and gelcoat from the damaged area and a 3-4 cm margin around it with 80-grit sandpaper, until sound fibre is exposed.
- Bevel the edges of the crack or hole into a ramp, extending the sanded area 2-3 cm beyond the visible damage: this is what allows the fibreglass patch to sit flush.
- Degrease with acetone the whole area before applying any product.
Step 2 — Reinforce broken mounting points
Fixing tabs and brackets are the area that breaks most often, because they concentrate all the stress from vibration and impacts in a very small spot. Before considering the repair finished, always reinforce these points, even if they are not the main damage that brought you here.
- If the tab has snapped cleanly, first glue it back in its original position with a dab of catalysed resin, held with tape until it gels.
- Laminate 2-3 layers of 163 g/m² woven fibreglass on the inner (hidden) side of the tab and of the area where it joins the rest of the part, overlapping well onto sound material on each side of the break.
- If the mounting point has lost material, mix some chopped fibreglass strands into the resin before applying it to that specific area: it adds extra localised strength without having to laminate additional layers.
Step 3 — Fill with filler if volume is missing
When the crack has left a gap or a through-hole, laminating directly over it leaves a sunken area. CRC Fibreglass Filler fills holes larger than 12 mm and sands easily once cured (20-30 minutes at room temperature). Always apply it over a first layer of already cured fibre, never directly into the hole, and fill slightly above the original level of the part before sanding back to shape.
Step 4 — Laminate the fibreglass patch
- Cut 2-3 stepped patches, each 1-1.5 cm larger than the previous one on every side, so that no hard edge shows.
- Catalyse the resin from the kit according to the workshop temperature: at 1.5-2% in summer or above 25 °C, at 2-2.5% in cold workshops or below 18 °C. Only mix what you will use in 10-15 minutes.
- Apply a first coat of resin over the bevelled area with the brush and place the smallest patch, soaking it well and removing the air with the laminating roller.
- Repeat with each patch, from smallest to largest, until you cover the whole area reinforced in step 2.
Step 5 — Sand and get the surface ready for painting
- Sand progressively: 80 grit to level the step of the laminate, 180 to refine the shape, 320 and 600 to leave a smooth surface.
- Apply a final coat of cellulose filler in a very thin layer over the whole repaired area: it covers the small pores left by the fibre and gives a much finer finish than fibreglass filler on its own.
- Sand again with 320-600 grit after the fine filler, until the repaired area feels the same as the rest of the part.
- Prime with a filler primer before painting, following the usual bodywork painting process: unlike gelcoat, fibreglass needs primer for good adhesion and to seal the last pores before the colour coat.
Specific tips for bumpers and fairings
Always reinforce from the inside, not just the outside
A laminate on the visible side alone holds up cosmetically but not under mechanical stress. Whenever you can get access, reinforce from the inside (the side that is not painted) and leave the outer side just for the fine filler and the finish.
Don't use the part until it has fully cured
Although it may feel hard to the touch within a few hours, the laminate reaches full mechanical strength after 5-7 days at room temperature. Fitting the part too early and subjecting it to vibration or road knocks can weaken the repair before it reaches its final strength.
Do a compatibility test if you are unsure of the material
If you are still unsure whether it is fibreglass or plastic after the tap and sanding check, apply a little resin to a small hidden spot and wait for it to cure: on fibreglass it will bond firmly; on plastic you will be able to peel it off with your fingernail with hardly any effort.
Watch out for vibration on motorbike fairings
Fairings suffer more engine vibration than a car bumper. Pay particular attention to reinforcing the mounting points to the subframe (rubber mounts, bolts) with an extra layer of fibre, even if that is not where the damage you are repairing is.
Materials at Feroca
In fibreglass and reinforcement fabrics and polyester resins you will find everything you need for this repair. If your project is a flat, thick surface rather than bodywork, also take a look at our guides to swimming pool repair, surfboards and kayaks and motorhome tanks.
Frequently asked questions
Is this guide suitable for the plastic bumper of an ordinary car?
No. Most bumpers on today's road cars are plastic (polypropylene), and polyester resin does not bond well to that material. This guide is for fibreglass parts: kit car bodies, classic cars, motorhomes and most fibreglass motorbike fairings.
How do I know whether my bumper or fairing is fibreglass or plastic?
Give it a sharp tap with your knuckles: fibreglass sounds stiff and "dry", plastic sounds duller and flexes when pressed. If in doubt, sand a small hidden spot: fibreglass leaves a whitish dust and visible glass strands, plastic scratches into shavings.
Why does it always break in the same place at the mounting points?
Because the fixing tabs and brackets concentrate all the stress from vibration and impacts in a very small spot. Always reinforce them with 2-3 layers of fibre on the inner side, even if they are not the main damage you are repairing.
Do I need gelcoat to finish the repair?
No, if you are going to paint the part. Unlike a swimming pool or a boat hull, a bumper or fairing is painted, so the correct finish is to sand fine, apply a coat of cellulose filler and then prime before painting, instead of sealing with gelcoat.
How long do I have to wait before fitting the repaired part?
Although it feels cured within a few hours, full mechanical strength is reached after 5 to 7 days at room temperature. Fitting the part earlier and subjecting it to vibration or road knocks can weaken the repair.
Can I repair it without removing the part from the vehicle?
You can, but removing it always makes the job easier: you will have access to the inner side to properly reinforce the mounting points, and you avoid getting resin or dust on the rest of the bodywork.
Comments (0)