Shopping Cart
- Feroca
- Cosplay
- 0 likes
- 6965 views
- 0 comments
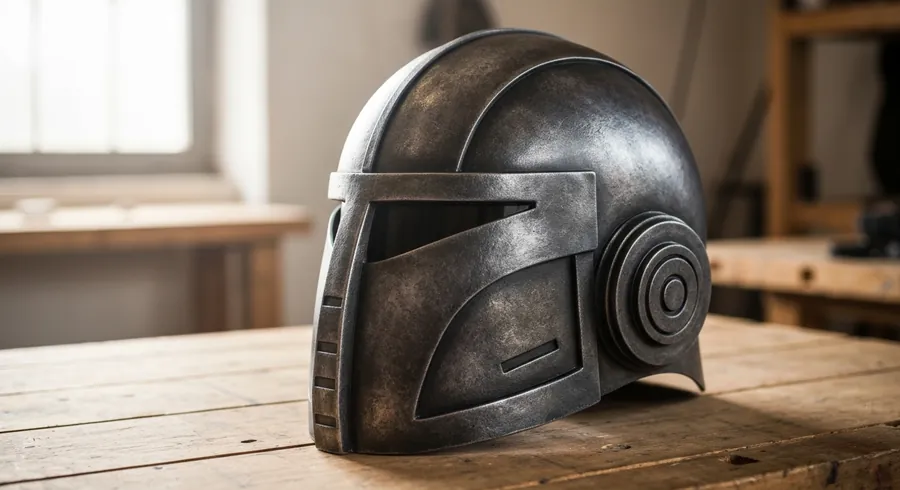
The helmet is the most recognisable piece of any cosplay. It defines the character, completes the look, and is the first thing everyone photographs. The good news is that making one with high-density EVA foam is within anyone's reach, even if it's your first time working with foam. In this guide we walk you through the entire process, from the pattern to the final metallic finish.
Materials you need
Before you start, gather everything you need. There's nothing more frustrating than stopping halfway through because something is missing.
| Material | Use |
|---|---|
| FRC FOAM 10mm | Main helmet structure |
| FRC FOAM 2mm | Surface details and decorative strips |
| EVA Contact Pro | Contact adhesive for all joins |
| EVA AIR Foam Clay | Seam filler and moulded details |
| FullDip Liquid Vinyl (black) | Quick, flexible sealing |
| 3D-Smoother | Sandable sealer for glossy finishes |
| Vallejo spray primer | Base coat before painting |
| Iron Powder / Gun Metal | Dry metallic finish |
| Cosplay magnetic clasps | Magnetic closures for removable pieces |
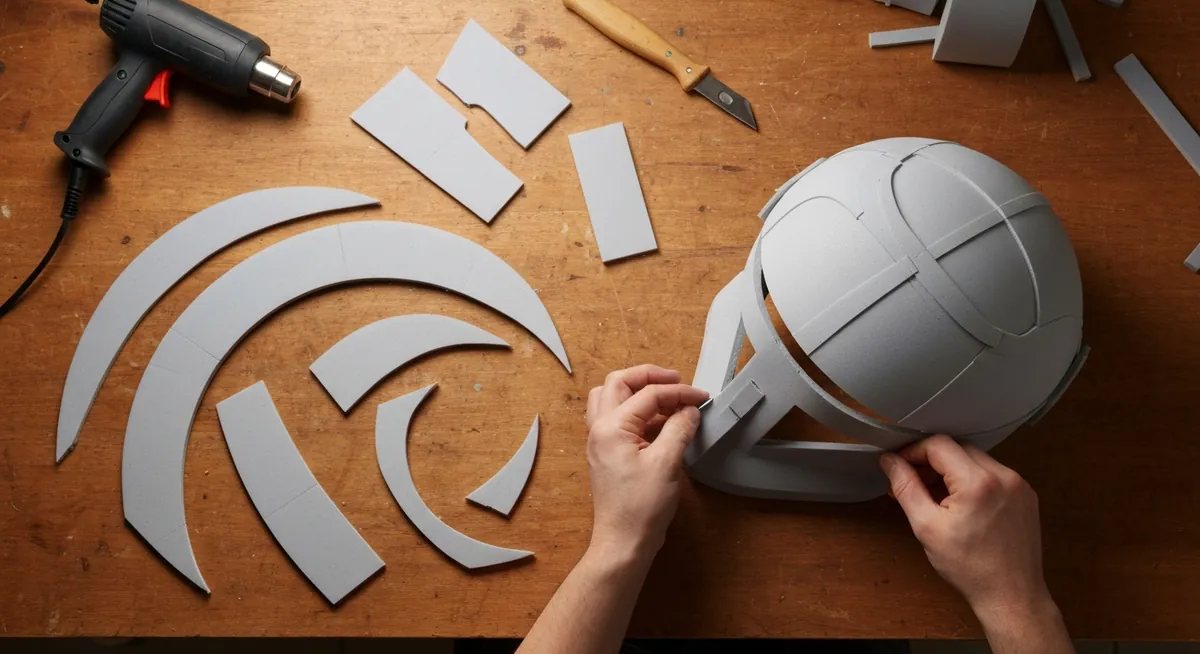
Step 1: The pattern
Everything starts on paper. You can find free patterns for countless helmets in cosplay communities — search for the character you want to make followed by "foam helmet pattern free". Print it to scale or draw your own by taking measurements of your head.
The trick professional makers use: draw only the left side. When you go to cut the foam, trace that side, flip the template over, and trace the mirror image. You save paper and guarantee perfect symmetry.
Always mark the interior side of each piece. And add an L or R on each side piece — it seems obvious until you've been gluing for half an hour and realise you have two right sides.
Step 2: Cutting the foam
With the templates ready, transfer them to the foam with a pen. Start with a generous rough cut to handle smaller pieces, then cut to the line precisely.
A craft knife with a fresh blade is enough for all the cuts. The key is not to tilt the blade — a clean perpendicular cut. Bevels (dotted lines on the pattern) are 40–45° cuts on the edges that will be joined: they allow the two faces to fit together at an angle and create the three-dimensional shape when glued.
Step 3: Heat shaping
This step makes the difference between a flat, lumpy helmet and one with natural curves. Before gluing anything, heat each piece with the heat gun and give it the curve it will have in the assembled helmet.
Apply heat at about 7–10 cm away, moving the gun in circles. After 10–15 seconds the foam will soften. At that point, press it against a rounded surface (a bowl, a ball) and hold the shape until it cools.
Don't skip this step. It's what makes assembly much easier and the result much more convincing.
Step 4: Assembly by subgroups
Work in subgroups: first assemble halves and small groups, then join them together. Don't try to put the whole helmet together all at once.
How to use EVA Contact Pro:
- Apply a thin, even coat on both surfaces to be joined.
- Wait 15–25 minutes until the adhesive is tacky (touch it with the back of your finger — it shouldn't stick, but it shouldn't feel wet either).
- Press together firmly. The bond is permanent from the first contact.
For the central seam joining the two helmet halves: apply two coats of adhesive, leaving a few minutes to dry between them. This is the most demanding joint. The foam is flexible, so you can stretch or compress it slightly to align the registration marks.
Step 5: Rigid pieces and magnetic closures
Some elements need more rigidity than 10mm foam: protruding accessories, articulated pieces, the visor mount. For these, use rigid PVC foam or stack several layers of foam glued together until you reach the required thickness.
For removable pieces, magnetic clasps are the perfect solution:
- Drill a recess with a Forstner bit of the exact diameter of the magnet, without going all the way through the piece.
- Apply superglue in the recess and immediately press the magnet in.
- Repeat on the complementary piece, making sure the polarity is correct before gluing.
Step 6: Filling seams with EVA AIR Foam Clay
Seams between pieces always leave a visible line. With EVA AIR Foam Clay you can fill them and achieve completely smooth transitions. Apply the paste directly onto the seam, dampen your finger with water, and smooth the surface.
Leave to dry for at least 24 hours. If the next day you notice the paste has shrunk slightly, apply a second coat. Once dry, sand with 220-grit and use a Dremel to clean up corners and round off edges.
Step 7: Sealing — two options depending on the finish
The sealing step defines the final finish of the helmet. You have two paths:
Option A: FullDip (matte or weathered finish)
Apply FullDip Liquid Vinyl in black directly onto the clean foam. A minimum of 4 thin coats, allowing 10 minutes to dry between each one. FullDip is flexible, doesn't crack with foam movement, and creates a perfect matte base to paint over. It's the fastest method.
Ideal for: weathered helmets, rough finishes, any helmet with many layers of paint.
Option B: 3D-Smoother (perfect glossy or metallic finish)
3D-Smoother is a high-viscosity epoxy resin that doesn't drip. Applied over the foam, it creates a hard, sandable layer until you achieve a perfectly smooth surface — impossible with any flexible sealer.
Mix the two parts (A and B), apply with a foam brush, and leave to cure overnight. The next day sand with 220-grit. A second coat gives a professional-level finish.
Ideal for: glossy metallic helmets, high-fidelity finishes.
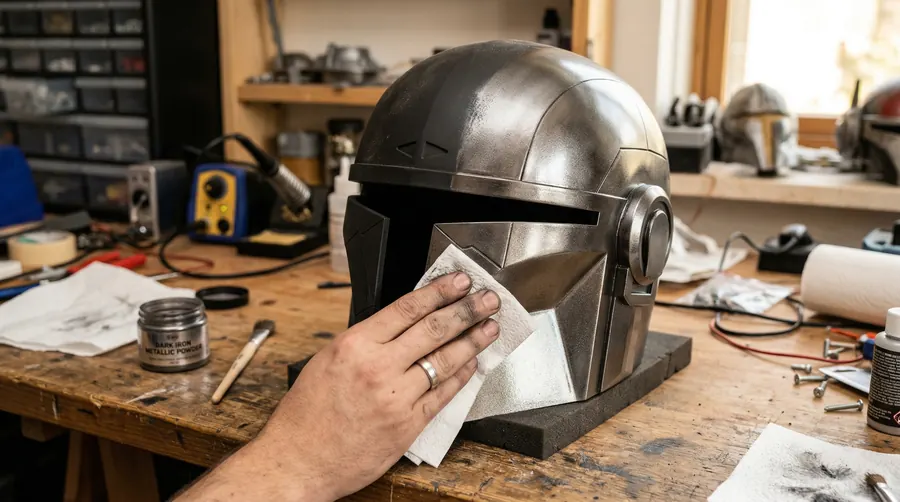
Step 8: Priming and metallic finish
Always prime before painting. Vallejo spray primer provides a uniform base that improves adhesion for any subsequent paint. Two thin coats from 25 cm away, in crossed passes.
Metallic finish with dry powder — the technique that transforms a black helmet into real metal:
- Apply gloss black acrylic paint over the primer. Leave to dry completely (overnight).
- Fold a sheet of kitchen paper into several layers and pick up a small amount of Iron Powder.
- Rub it in circles over the black surface with moderate pressure.
- The powder adheres and creates a dark metallic effect with natural variations in sheen.
- On edges and worn areas, apply more powder and rub with more pressure.
- Protect with satin acrylic varnish in spray.
For a darker gun metal tone use Gun Metal Bronze Powder (dark grey). For a brighter silver effect, use Aluminium Powder.
Step 9: Layered painting and weathering
For helmets painted in several colours with a chipped, weathered paint look:
- Base coats by zone: apply each colour in its area, using masking tape where necessary.
- Chipping effect: paint the "inner" colour first. Then apply the top coat deliberately leaving some edges uncovered.
- Weathering wash: mix very watered-down black and brown acrylic paint (80% water). Spread it across the entire surface and remove the excess with a cloth, leaving the wash in cracks and recesses.
- Final varnish: matte or satin depending on the character.
Step 10: The visor
Use tinted polycarbonate plastic — replacement visors for sun protection masks are the most widely used by cosplayers: they have the right curvature and tint. Fit it into the opening, mark it, cut it with strong scissors, rough up the edges with sandpaper so the hot silicone has something to grip, and glue it from the inside.
Frequently asked questions
What thickness of foam do I need for a cosplay helmet?
The standard is 10mm for the main structure and 2mm for surface details. For thicker pieces, stack several layers of 10mm glued together with EVA Contact Pro until you reach the required thickness.
Can I use a hot glue gun instead of contact adhesive?
Only for securing the visor or temporarily positioning pieces. For the structural seams of the helmet you need a contact adhesive specifically designed for EVA: hot glue creates bond points that come apart with movement and heat.
How long does it take to make a complete helmet?
Between 3 and 5 days counting drying times: an afternoon for cutting and basic assembly, 24 hours for seam filling, one night for sealing with 3D-Smoother, and one final session for painting and weathering.
Does the foam hold up in the heat at a summer event?
FRC FOAM at 156 kg/m³ handles the temperatures of any event perfectly under normal conditions. What you should avoid is leaving it inside a car parked in the sun: temperatures can exceed 60°C and the foam would start to deform. Sealing with 3D-Smoother adds extra thermal rigidity.
Which sealer is better, FullDip or 3D-Smoother?
It depends on the finish you're looking for. FullDip is faster and more flexible, perfect for matte and weathered finishes. 3D-Smoother gives a sandable, hard surface, ideal if you want a glossy or very smooth metallic finish. For most action or adventure helmets FullDip is enough; for display finishes or high-fidelity replicas, 3D-Smoother makes all the difference.
Comments (0)