Shopping Cart


SFX Starter Kit
200170000
€70.00
84,70 € Tax incl.
84,70 € Tax incl.
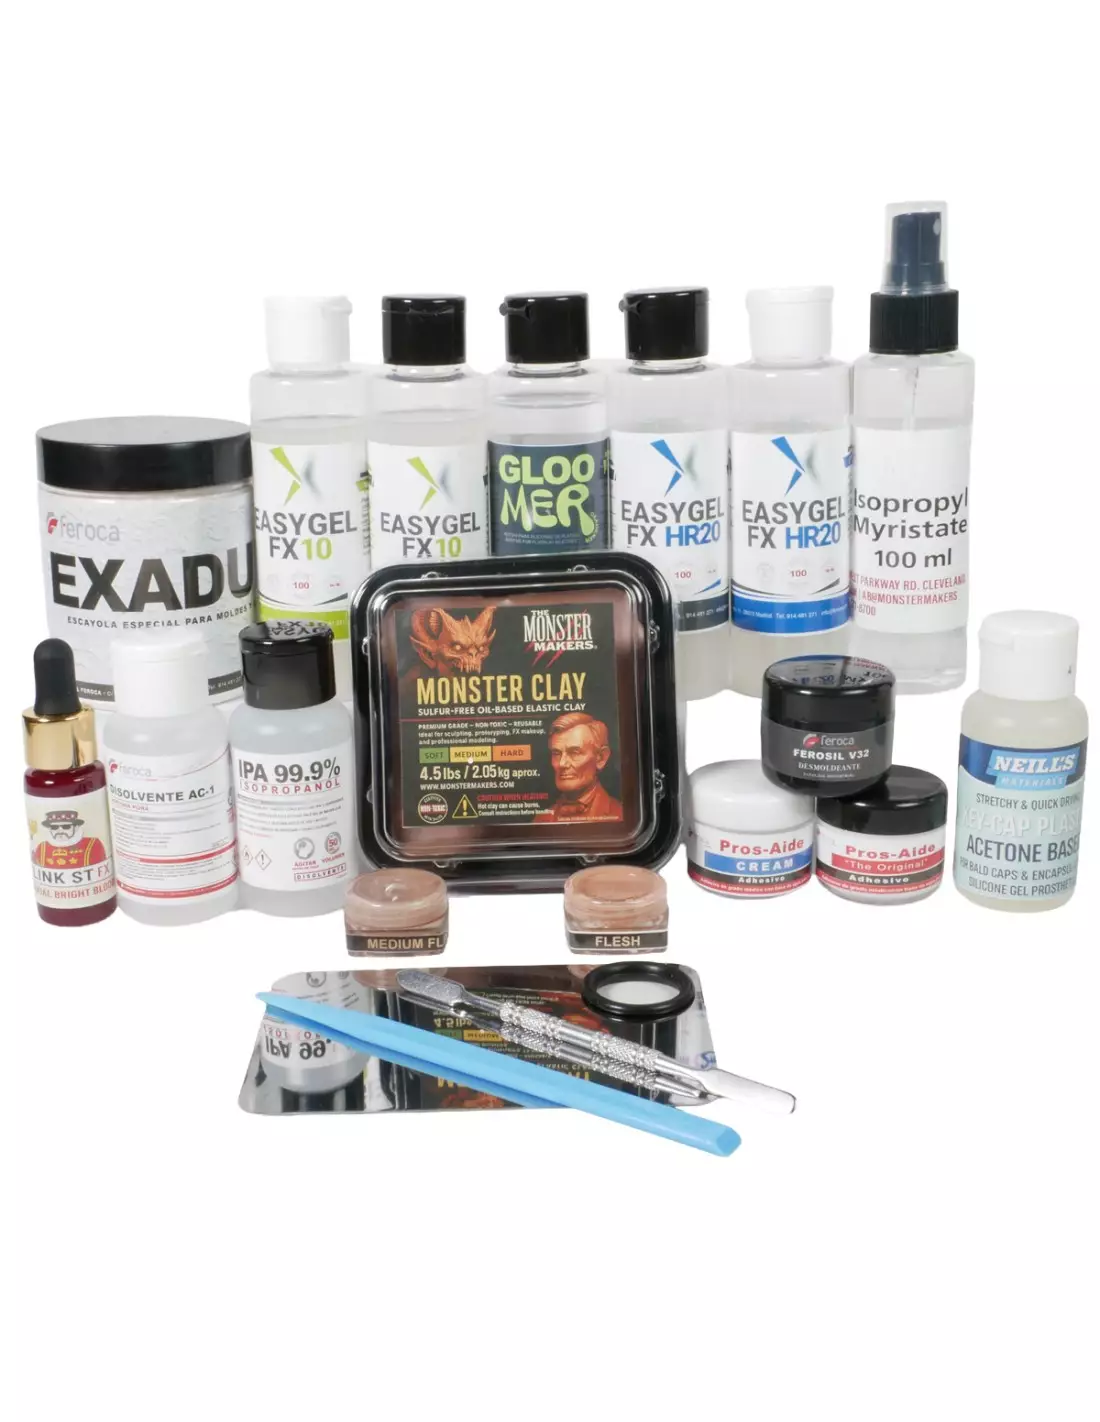
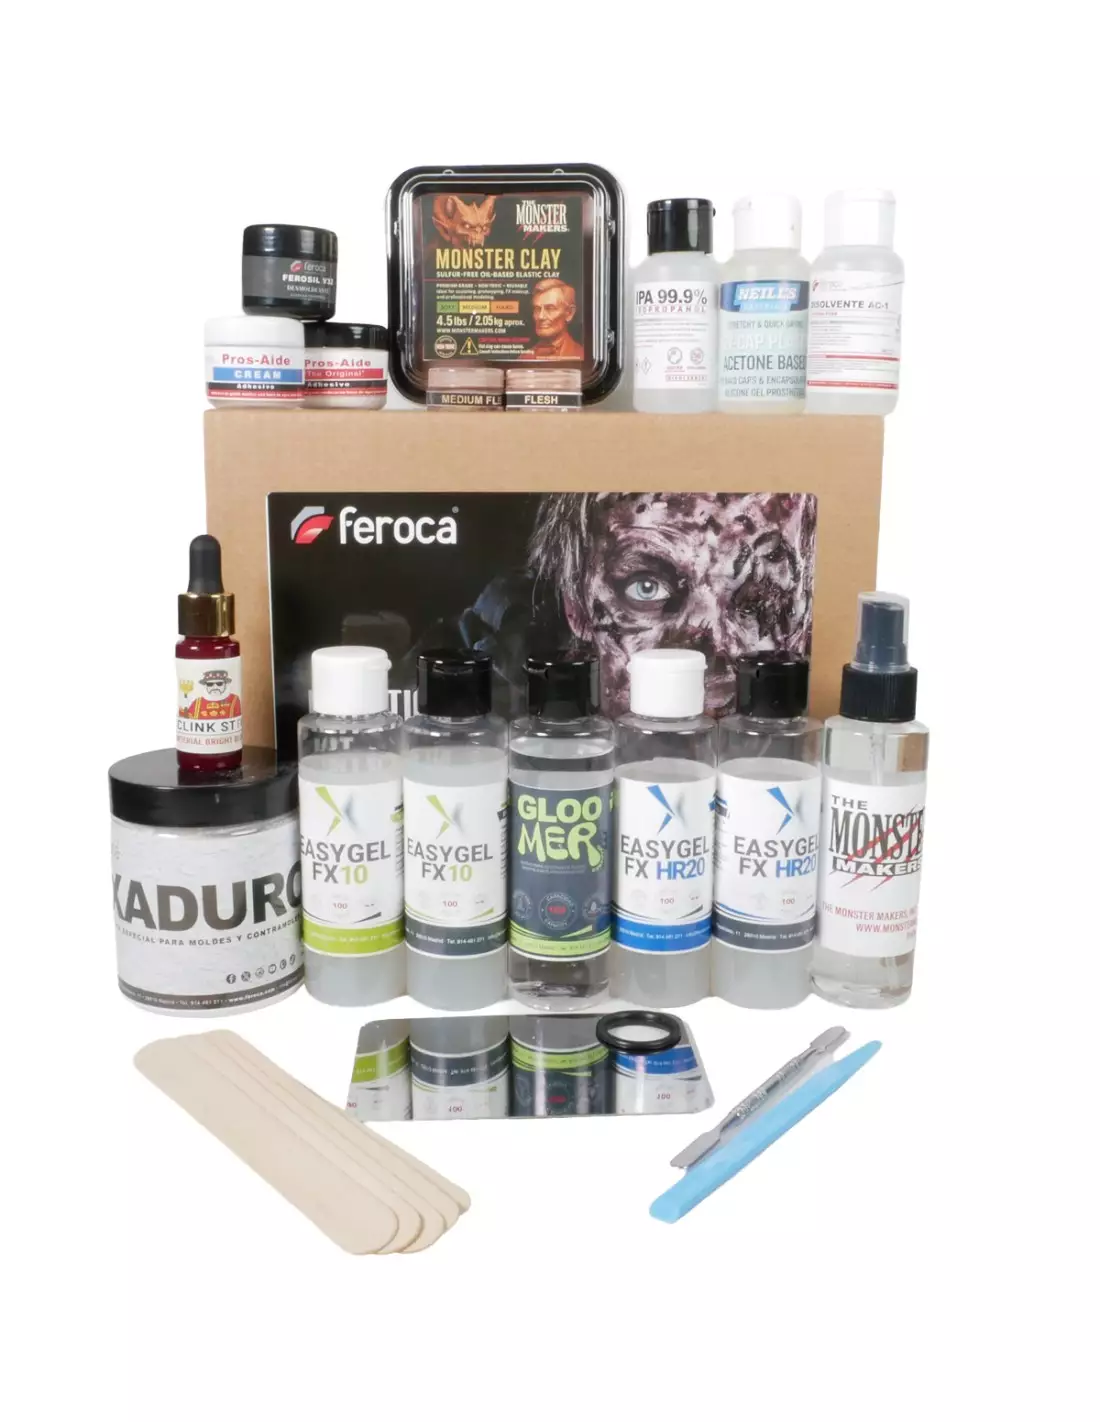
Complete SFX kit: sculpting, mould making, casting, pigmentation, encapsulation and application. Includes silicone, plaster, adhesives, pigments and tools.
The SFX Starter Kit is the complete solution for anyone who wants to get into creating silicone prosthetics for special effects without having to source each product separately. It covers the entire real workflow: from sculpting and mould making to adhesion, edge blending and final clean-up, using professional materials in formats designed for starter projects or for testing new techniques without a major investment.
Kit contents
| Product | Quantity | Role in the process |
|---|---|---|
| EASYGEL HR 20 | 200 g | Silicone for mould making |
| EASYGEL FX 10 | 200 g | Silicone for casting copies (prosthetics) |
| GLOOMER Deadener | 100 g | Deadening agent to reduce the Shore Hardness of the silicone |
| MONSTER CLAY | 100 g | Clay for sculpting the model/positive |
| KEY CAP ACETONA | 50 g | Encapsulation of the silicone prosthetic |
| AC1 Pure Acetone | 50 ml | Remove bald cap edges and clean surfaces |
| IPA isopropyl alcohol | 50 ml | Degreasing and silicone cleaning |
| Isopropyl Myristate (spray) | 100 ml | Makeup remover and adhesive removal |
| Pros-Aide | 15 ml | Adhesive for bonding the prosthetic to skin |
| Pros-Aide Cream | 15 g | Transfer fill and edge blending |
| FEROSIL Release Agent | 15 g | Release agent for plaster or silicone moulds |
| CLINK Arterial Blood | 20 g | Blood effect for character makeup |
| DYE PLAT Flesh | 5 g | Flesh tone pigment for platinum silicone |
| DYE PLAT Medium Flesh | 5 g | Medium flesh tone pigment for platinum silicone |
| EXADURO | 300 g | Plaster for the rigid mould shell |
| Application kit | — | Steel pick, stainless steel palette, dental spatula, 5 tongue depressors |
What it's used for
This kit is designed to complete the full manufacturing and application process of a platinum silicone prosthetic: from shaping the idea on the workbench to having the piece bonded and blended onto the actor's or model's skin. It is ideal for makeup artistry students, makeup artists looking to get started in SFX and professionals seeking a reference pack for specific projects.
- Fabrication of facial silicone prosthetics: noses, ears, scars, wounds, creatures.
- Making two-part moulds (flexible silicone + plaster shell) from a sculpture.
- Adjusting silicone hardness by adding GLOOMER (deadener/gelling agent) to achieve a softer, more natural-moving prosthetic.
- Intrinsic pigmentation of the silicone with flesh tones prior to casting.
- Encapsulation of the prosthetic to protect the surface and prepare it for subsequent painting.
- Bonding, edge blending and finishing during on-actor application.
- Gender, age and creature transformation makeups for film, television, theatre or photography.
- Blood and wound effects on the prosthetic once applied.
How to use it
- Sculpting with MONSTER CLAY: heat the jar in the microwave in short intervals of no more than 40 seconds. Take the required amount and sculpt, defining thin edges and skin-contact areas carefully. A clean edge reduces subsequent flashing work.
- Applying the release agent (FEROSIL): coat the entire sculpture and support surfaces with FEROSIL Release Agent before pouring any mould material. Pay special attention to details and concave areas.
- Mould making (EASYGEL HR 20 + EXADURO): mix EASYGEL HR 20 at the indicated ratio and pour or brush onto the sculpture to obtain the flexible part. Once cured, reinforce with an EXADURO shell. Allow to harden completely before opening the mould.
- Preparing the casting silicone (EASYGEL FX 10 + GLOOMER Deadener + DYE PLAT): mix EASYGEL FX 10 with the desired proportion of GLOOMER Deadener to soften the final Shore Hardness. Add DYE PLAT Flesh and/or DYE PLAT Medium Flesh until the desired flesh tone is achieved. Mix thoroughly and degas if a vacuum chamber is available.
- Casting the copy: pour the mixture into the mould (freshly re-released with FEROSIL), close and allow to cure according to the silicone's timings. Open carefully and trim any flashing with scissors or a scalpel.
- Encapsulation (KEY CAP ACETONA): apply KEY CAP ACETONA over the surface of the trimmed prosthetic to encapsulate it. Allow to dry between coats. This protects the piece and prepares the surface for paint or makeup.
- On-set bonding (Pros-Aide): degrease the skin thoroughly with isopropyl alcohol. Apply Pros-Aide to the inner face of the prosthetic and to the corresponding skin area, allow to dry to the touch (matte appearance) and press firmly. Blend the edges with Pros-Aide Cream to eliminate the transition line.
- Finishing touches and effects: paint or tint over the encapsulation, apply CLINK Arterial Blood if the design requires it, and complete the integration makeup.
- Removal and clean-up: use Isopropyl Myristate (spray) to lift and dissolve the adhesive without irritating the skin. Clean the prosthetic with isopropyl alcohol and store away from heat and direct light.
Warning — Platinum silicone inhibition: EASYGEL HR 20 and EASYGEL FX 10 are addition-cure (platinum) silicones. The platinum catalyst can be inhibited (the material does not cure or remains tacky) through contact with certain substances: sulphur-containing clays, latex, cyanoacrylate adhesives, latex gloves, tin residues or certain tin-based release agents. Always use MONSTER CLAY (sulphur-free) for sculpting, nitrile gloves and FEROSIL as release agent. If you are unsure about surface compatibility, always perform an inhibition test before making the full mould.
Usage tips
Inhibition test before you start
Before pouring EASYGEL HR 20 over the complete sculpture, mix a small amount and place it in direct contact with the surface you intend to mould. If after 24 h the contact area is still tacky, there is inhibition. Clean the area with isopropyl alcohol, apply a coat of hairspray or a specific barrier and repeat the test. Do not skip this step: losing 5 g of silicone is far cheaper than losing an entire mould.
Hardness adjustment with GLOOMER Deadener
GLOOMER Deadener is added to either of the two silicone components before mixing them together. Start with low proportions (10–20 % by weight of the total) and increase gradually. The more Deadener, the softer and more translucent the prosthetic will be, but also the more fragile at thin edges. For facial prosthetics with soft movement, 30–40 % typically gives good results.
Intrinsic pigmentation: pre-mix in one component first
Mix the DYE PLAT pigments into just one of the two silicone components before combining them. This ensures uniform pigment dispersion. The final colour is always slightly lighter once cured: make a small sample and allow it to cure before finalising the colour of the full casting. Combine DYE PLAT Flesh with DYE PLAT Medium Flesh to achieve different undertones depending on the actor's skin tone.
Perfect edges with Pros-Aide Cream
Pros-Aide Cream is applied with a tongue depressor or spatula directly onto the edge of the bonded prosthetic, blending the transition into the skin. Work in thin layers and allow to dry between them. Once dry, paint over to match the tone. This is the standard technique for making the join invisible at close range and telephoto distances.
Frequently asked questions
Is prior experience required to use this kit?
It is not essential, but a basic understanding of silicone mixing and workshop material handling is advisable. The kit covers all stages, but the quality of the result depends largely on care during sculpting and edge work. If this is your first contact with platinum silicones, read the technical data sheets for EASYGEL HR 20 and EASYGEL FX 10 before starting and always carry out a prior inhibition test.
Can I make more than one prosthetic with this kit?
It depends on the size of the piece. With 200 g of EASYGEL HR 20 you can make a mould the size of a nose or medium scar. The 200 g of EASYGEL FX 10 will yield one or two copies of that same size, depending on the cavity volume and mixing losses. The EXADURO (300 g) is sufficient for a small to medium facial mould shell.
Is the silicone in this kit suitable for skin contact?
EASYGEL FX 10 is formulated for special effects prosthetics in skin contact. For prolonged use or on sensitive skin, always consult the product's safety data sheet and carry out a prior patch test on a small area of the actor.
What happens if the silicone does not cure or remains tacky?
The most common cause is inhibition through contact with a substance incompatible with the platinum catalyst (sulphides, latex, certain adhesives). Check the materials the silicone has been in contact with, clean surfaces thoroughly with isopropyl alcohol, perform an inhibition test and repeat the process. Also verify that the mix ratio is correct by weighing on a scale.
How is the prosthetic removed without damaging the skin or the piece?
Apply the Isopropyl Myristate spray around the edges of the prosthetic, allowing it to penetrate between the silicone and the skin to dissolve the Pros-Aide. Lift gently from the edges towards the centre without pulling sharply. Once removed, clean the skin with more Isopropyl Myristate and the prosthetic with isopropyl alcohol to remove any adhesive residue.
Can I use this kit to mould body parts directly (body casting)?
EASYGEL HR 20 is not suitable for direct body casting on skin. For moulds of hands, feet or other body parts taken directly, the appropriate material is alginate. Feroca has a Kit for Hand, Foot and Body Moulds (alginate + plaster) specifically designed for that technique.
How long does the silicone in this kit take to cure?
EASYGEL HR 20 and EASYGEL FX 10 cure at room temperature. Demould time varies with workshop temperature: at 20–23 °C it is typically ready in 4–6 hours. Do not accelerate curing with direct heat unless the manufacturer expressly states otherwise. Always work above 18 °C to ensure a complete cure.
Can the kit components be replaced or expanded individually?
Yes. All products included in the kit are available in Feroca's catalogue in larger formats. Once you have worked through the kit and know which materials you use most, you can purchase them individually in the standard pack sizes for each reference, optimising the cost per project.
No reviews
Tap to zoom