
Shopping Cart
- Feroca
- Mold Making Silicones
- 0 likes
- 3922 views
- 0 comments
Food Safe platinum silicone is the go-to material for making chocolate, candy, gelatin, ice, and baking moulds. It's flexible, non-stick, captures fine details, and withstands hundreds of uses without degrading. In this article we explain how to make a food mould step by step, which FDA silicone to choose for each application, and what mistakes to avoid so your mould comes out perfect on the first try.
Why platinum silicone and not tin
Not all silicones are suitable for food contact. Condensation (tin) silicones are not valid because their organotin compound catalysts can migrate into food. Only addition (platinum) silicones, once fully cured, are inert and comply with food contact regulations.
Feroca's three FDA silicones comply with US standard 21 CFR 177.2600 and European Regulation (EC) 1935/2004. The certification applies to the already-cured material: during the mixing and curing process the silicone is not in a food-contact condition. The mould must be completely cured and washed before using it with food.
Feroca's 3 FDA silicones
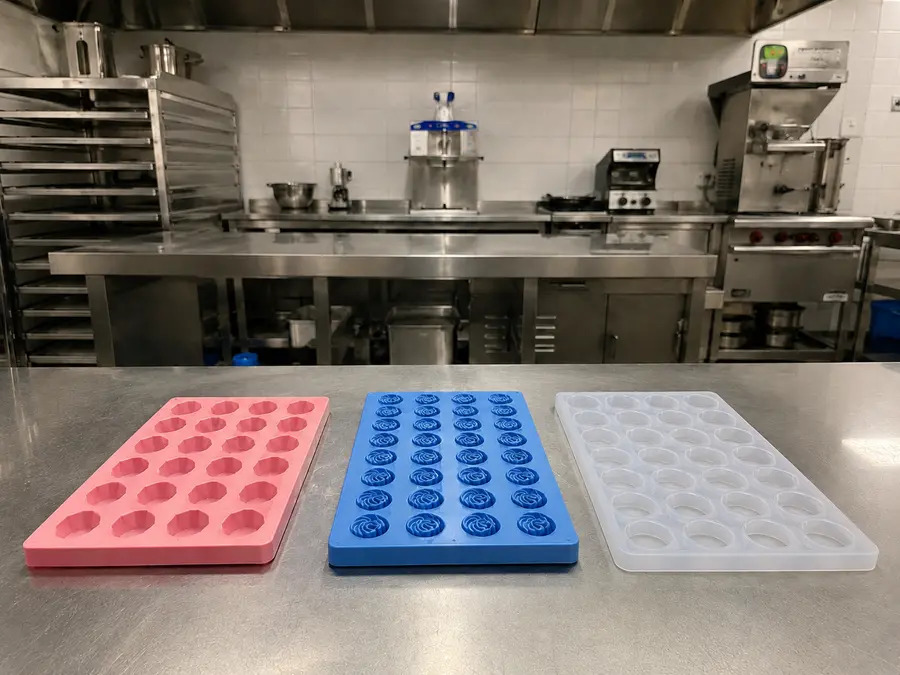
All are platinum-based, 1:1 mix by weight, 30 minutes working time and cured in 3 hours. The difference lies in hardness and heat resistance:
| Product | Shore | Colour | Temp. Resistance | Best for |
|---|---|---|---|---|
| Easyl 940-FDA Pink | A40 | Pink | Standard | Series production, chocolate, candy |
| Easyl 925-FDA Blue | A25 | Blue | Standard | Relief chocolates, ice, gummy sweets |
| Easyl 925-FDA Translucent | A25 | Translucent | up to 220 °C | Oven, isomalt, muffins, cookies |
If you're going to bake or work with isomalt at high temperatures, the only valid option is Easyl 925-FDA Translucent. For chocolate, candy and cold ice you can choose between the Pink (firmer, more durable) and the Blue (more flexible, better for pieces with lots of relief).
Step 1 — Preparing the original
The original is the object whose shape you're going to copy in silicone. It can be a plastic, ceramic, metal, wood or any rigid material figure.
- Plastic, metal, glass: no pre-treatment needed. Silicone does not adhere to these materials.
- Wood and porous materials: seal with a coat of acrylic varnish or lacquer before moulding. If not sealed, the silicone penetrates the pores and demoulding may tear part of the surface.
- Soft materials or those containing sulphur: platinum silicone is sensitive to inhibition by sulphur compounds (sulphur-based clays, some adhesives, latex). Always do a test with a small amount before making the full mould.
Place the original at the bottom of a container (which can be cardboard, plastic or clay) fitted to its size. The tighter the container, the less silicone is wasted.
Step 2 — Mixing and pouring the silicone
All of Feroca's FDA silicones use a 1:1 ratio by weight. Use a kitchen scale to weigh equal parts of component A and component B.
- Weigh: calculate the approximate volume of the mould (length × width × height of the container minus the volume of the original) and add a 10% margin. Silicone weighs approximately 1.1 g/cm³.
- Mix: pour component B onto A and mix with a spatula for 2 minutes, scraping the sides and bottom of the container thoroughly. The mixture must be completely homogeneous and uniform in colour.
- Pour: pour the silicone in a thin stream along one side of the container so that air can escape. Do not pour directly onto the original to avoid trapping bubbles in the details. You have 30 minutes of working time.
- Degas (optional): if you have a vacuum chamber, degas the mixture before pouring for 2–3 minutes. This eliminates 100% of bubbles and greatly improves mould detail.
Step 3 — Curing and demoulding
Leave to cure at room temperature for a minimum of 3 hours. Do not demould early even if the surface appears solid: the interior may not have fully cured. An improperly cured silicone can transfer residues to food.
To speed up curing you can place the mould in the oven at 60–70 °C for 1 hour. This is especially useful with Easyl 925-FDA Translucent, which is resistant up to 220 °C.
To demould, carefully separate the edges of the mould from the container and remove the original. If there is resistance, gently flex the mould outward. FDA silicone does not need a Release agent: it is naturally non-stick.
Step 4 — First use and maintenance
Before the first use with food, wash the mould with warm water and mild soap, rinse thoroughly and leave to dry completely. This step removes any surface residue from the manufacturing process.
For maintenance: always wash with warm water and mild soap after each use. Do not use dishwashers with aggressive cycles or abrasive scrubbers. Store in a dry place away from dust. Do not apply essential oils or solvents. A well-maintained mould made with Easyl 940-FDA Pink or Easyl 925-FDA Blue can be used hundreds of times.
Tips by food type
- Chocolate: use tempered chocolate at 28–32 °C. Silicone conducts heat poorly, so the chocolate may take slightly longer to crystallise. The mould does not need to be pre-warmed. Use Easyl 940-FDA Pink for series production or Easyl 925-FDA Blue for complex shapes.
- Ice: silicone withstands the freezer perfectly. Easyl 925-FDA Blue is the most suitable due to its flexibility when demoulding ice.
- Muffins and cookies (oven): use exclusively Easyl 925-FDA Translucent. Place the mould on a rigid baking tray to make handling easier when hot.
- Isomalt and sugar: isomalt is worked at 150–180 °C. Only Easyl 925-FDA Translucent (resistant up to 220 °C) guarantees that the mould will not degrade at these temperatures.
- Gelatines and gummy sweets: any of the three will work. They are poured hot (60–80 °C) and do not require oven temperatures.
Frequently asked questions
How much silicone do I need for my mould?
Calculate the interior volume of the container (length × width × height in cm) minus the approximate volume of the original. Multiply the result by 1.1 (approximate density of silicone in g/cm³) and add a 10% margin. For example, for a mould of 15×10×3 cm with an original that occupies a third of the volume: (15×10×3) × 0.66 × 1.1 ≈ 330 g of mixed silicone.
Why hasn't my silicone cured properly?
The most common causes are: incomplete mixing (streaks remain uncatalysed), ambient temperature too low (below 18 °C curing slows down considerably), or inhibition through contact with incompatible materials such as sulphur-based clays, latex, or some adhesives. If the silicone remains sticky on the surface of the original, the problem is almost always inhibition: test with the original material before making the full mould.
Does a silicone mould need a Release agent for chocolate?
No. Platinum silicone is naturally non-stick and chocolate demoulds on its own when properly crystallised. Applying release agents or oils can leave residue on the chocolate and affect the surface shine. Simply make sure the chocolate is well tempered and completely crystallised before demoulding.
What's the difference between the FDA Blue and the FDA Translucent if both have Shore A25?
The Shore hardness is the same, but the FDA Translucent resists up to 220 °C and is transparent, making it suitable for baking and isomalt. The FDA Blue is not designed for temperatures beyond those typical in cold confectionery. Its blue colour has the advantage of making it easier to see coverage when pouring and to detect bubbles in the mould before it cures.
How many uses can a Food Safe silicone mould withstand?
A well-made and well-maintained mould can withstand hundreds of uses. Easyl 940-FDA Pink (Shore A40) is the most wear-resistant option for intensive production. The factors that most shorten a mould's lifespan are: rough demoulding with sharp objects, exposure to solvents or aggressive essential oils, and temperatures above those specified for each product.
Can I use these silicones to make moulds for complex 3D figures?
Yes, but figures with undercuts (parts that protrude and cannot be demoulded in a single piece) require a two-part mould. The process involves moulding the lower half first with a clay support, curing, removing the clay, applying a coat of Release agent to the already-cured silicone (so the two halves don't stick to each other) and pouring the second half. Easyl 925-FDA Blue is the most suitable due to its flexibility when demoulding.
Comments (0)