
Shopping Cart
- Feroca
- News
- 0 likes
- 4850 views
- 0 comments
Painting miniature figures comes with the added challenge of size, but that doesn't make it a complicated or impossible task. So if you're thinking about getting into the world of painting small figures, learn the different lighting techniques with simple tricks that will make the job easier, achieving professional-level details.
In this article you'll find a guide and video tutorial that shows you step by step the process of priming, drying and painting miniature figures.
Materials for painting miniature figures with the zenithal lighting technique
Below we explain the basic materials we'll be using to apply lights and shadows and thus give volume to the miniatures.
It's important to bear in mind that there are techniques and materials that help paint adhere better. Likewise, it's worth noting that when applying light and shading techniques, the role of water is essential, as it allows the paint to spread more evenly by reducing the product's density.
Feroca materials guarantee you the best sealing and finishing results.
- First, we'll use two Vallejo spray primer cans. One in white and one in grey.

- Next, you need to choose the colours from the range you want to use. Click to discover our Vallejo primers and paints.
- Once selected, you'll also need a painter's palette to transfer, mix and thin the colours with water from their respective containers. It's not essential, but it will make things much more convenient.

- A domestic hot air dryer. Although these paints dry quickly, we'll use it to speed up the results of both the primer and the different layers of acrylic paint.
- You'll also need ergonomic brushes, it's important to use different sizes.
We recommend the Ferocast by Marta Kolinski brushes. These are high quality brushes that will make the painting process easier, allowing you to work with great precision.

- Paper kitchen towels to remove excess paint from the brushes, and a container of water.
Video tutorial on lighting techniques for painting miniature figures
In the following video you'll learn the steps to follow to paint small-scale figures using two very simple techniques to apply.
-
Zenithal technique for building up light using glazes and transparencies
When we talk about this technique, we're referring to the type of lighting we choose to decorate our figure. We need to select where the main light source is located, which in this case is directly above the head. This will define the contrast between lights and shadows that we'll enhance through the painting process.
-
The colour building technique
This refers to starting from basic, dark colours that will define the most shaded areas. Then, using subtle-intensity strokes known as glazes and transparencies, we progressively layer lighter colours that will highlight the areas of greatest illumination.
These techniques are very widely used, and the acrylic medium of this paint range Model Color, besides being odourless and non-toxic, is very easy to apply thanks to its water-soluble formulation.
Step by step guide to painting a miniature figure like a professional
Preparing the figure and priming
- First, clean the surface of the figure to remove any grease stains or dirt.
- The figure is now ready to receive the first primer coat.
We recommend wearing a mask when using aerosol sprays.

This is a primer specially designed for metal, plastics and any type of resin or putty. Its function is to improve the adhesion of acrylic paints on polyurethane or polyester resins.
This primer is perfect for unifying the colour of the figure and will also improve the adhesion of the different paint layers or glazes.
- Finally, use the dryer to speed up the drying of the primer.

- Now spray white primer from the top. This will mark the areas of greatest illumination and will help guide the subsequent brush lighting strokes.
It's important at this stage not to cover the entire figure.
- As before, use the dryer to speed up the process.
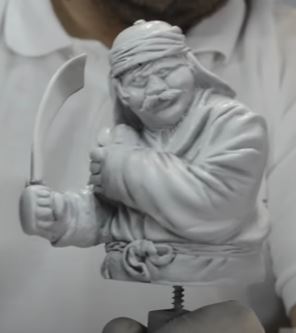
We start painting the miniature figure
You should start painting the figure from the inside outwards, that is, from the face to the extremities of the figure.
- Pour the selected colours onto the palette, choosing the base colours and mixing them until you achieve the desired colour for each part of the figure.
It's important to use water to reduce the paint's density and make the process easier.
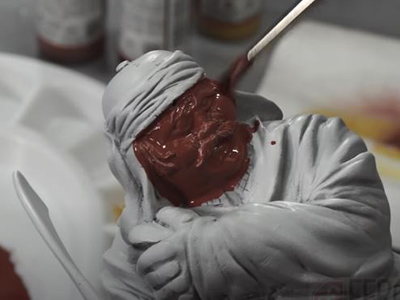
- Once the surface is painted in a uniform, not too light colour, start defining the volumetric surfaces that bring light to the strokes on the most prominent points. This is achieved with the help of water and the new colour.
This process is repeated successively with lighter colours until the desired finish is achieved.
You'll likely need increasingly finer brushes, as will the strokes themselves.

Once this is done, we've completed the lighting and shading process for the face. Next, add details such as hair and eyes.

- Now, in this miniature example, we move on to the rest of the figure, painting with a darker base colour to which we'll apply lighter layers with the help of water.

- Here you can add a wealth of details to achieve a more realistic finish, such as highly diluted black paint in the recesses to add greater depth to the colour and finish, creating a shaded effect.
In the same way, we'll use light colours to highlight volumes and add luminosity.

- We'll repeat this process on the furthest extremity, the figure's cap. Using a darker base to which we'll apply lighter, more highlighted points.
Details are the key to achieving a realistic and detailed figure.
If you want to innovate and add accessories to your miniature figures, it's possible with the flexible polymer clay Cosclay. In the following post we give you all the details: Making toys with Cosclay
The best products and tutorials for painting, only at Feroca
We constantly innovate to bring you the highest quality products for moulding, modelling, painting, special effects make-up, repairs and other crafts, allowing you to achieve professional results.
We encourage you to explore our website and social media to discover our extensive catalogue and the results our customers achieve.
Comments (0)